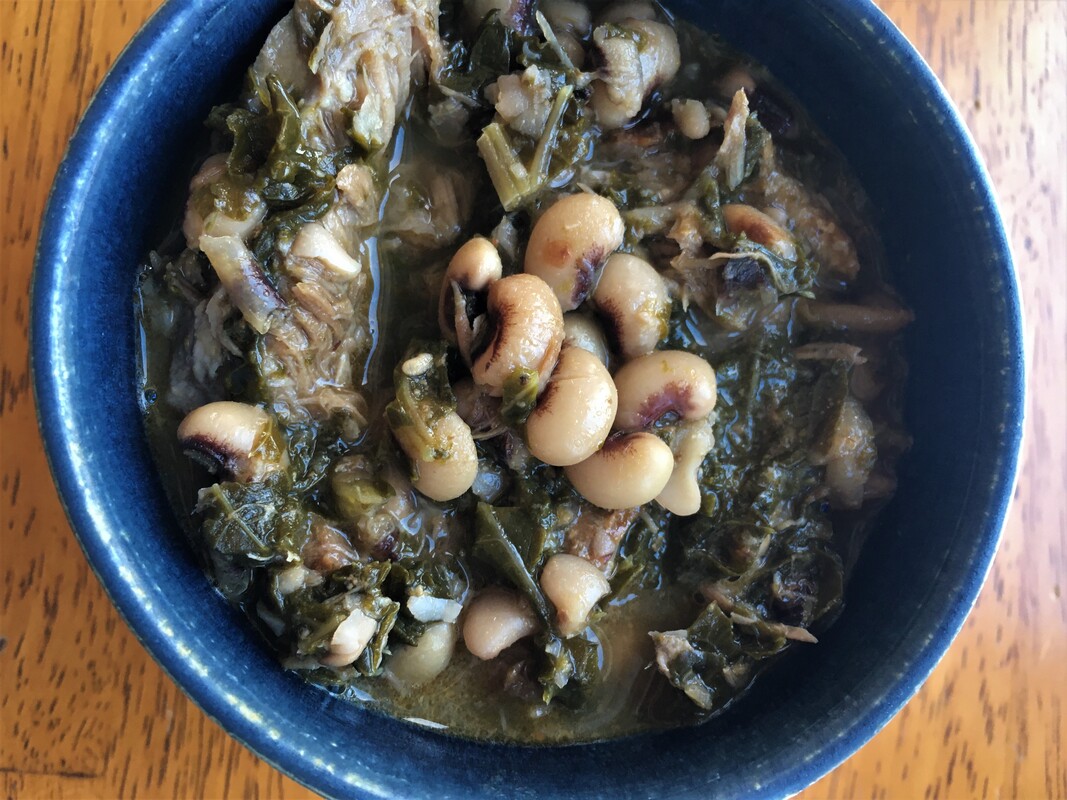
 This is a dish I made on New Year's Day yesterday, as black-eyed peas are traditionally eaten on New Year's to bring good luck and prosperity for the year. Who couldn't use a bit more of that? This was one of the food traditions I remember from growing up and have held on to myself. Not only is this a fun tradition, but it is so delicious and comforting on a cold January day. This dish is also packed with nutrients, which is really what brings prosperity, right? Black-eyed peas are a good source of folate and fiber, the greens are rich in vitamin K, folate, calcium, and magnesium, and the bone broth is full of glutamine, glycine, collagen and plenty of minerals. Pair this with a fermented vegetable or hot sauce to balance out the rich flavors and add some probiotics, and you have started your year in the best way possible. Here's to 2020! Black-Eyed Peas and Greens in Pork Broth
Serves 4-6 1 lb dried black-eyed peas Pinch of salt and dash of apple cider vinegar 1 Tbs bacon fat or lard 1 medium yellow onion, diced 3-4 cloves garlic, minced 4cups pork bone broth (see below for instructions) 2 cups water 1 tsp sea salt Black pepper to taste Meat removed from pork bones 1/2 tsp paprika 1/4 tsp cayenne, or to taste 2 Tbs apple cider vinegar A few dashes of hot sauce, to taste The day before making this dish, prepare the peas and broth: To start the peas, begin by soaking 24 hours before you want to begin cooking them. Rinse the dried black-eyed peas and put in a medium bowl. Cover with warm water and add a pinch of salt and splash of apple cider vinegar to begin the fermentation process. Set aside until the next day. To make the broth, place about 3 lbs of pork neck bones, pork soup bones, pig tails, or smoked pork hocks in a slow cooker and cover with water, about 4 quarts. Add a tsp of salt and 1 Tbs of apple cider vinegar. You can also add other ingredients like herbs, spices, onions, etc. to your preference. Turn to low and let cook 18-24 hours, then strain out the bones before using in this recipe. Remove the meat from the bones and set aside to add to the beans. To prepare the dish: Heat the bacon fat or lard in a medium stock pot. Once melted and hot, add the onions. Saute for 5-8 minutes until softened and beginning to brown, then add the onions and saute for 1-2 more minutes. Add the bone broth, water, salt and pepper. Bring to a boil then cover and turn the heat to medium. Let cook about 45 minutes. Once the beans are cooked most of the way, add the greens, paprika, cayenne and meat. Cover and let cook another 30 or so minutes, until the black-eyed peas are fully cooked through and soft. Add the apple cider vinegar and hot sauce, if using, and let cook on low another 5 minutes. Serve hot with cornbread and plenty of butter.
1 Comment
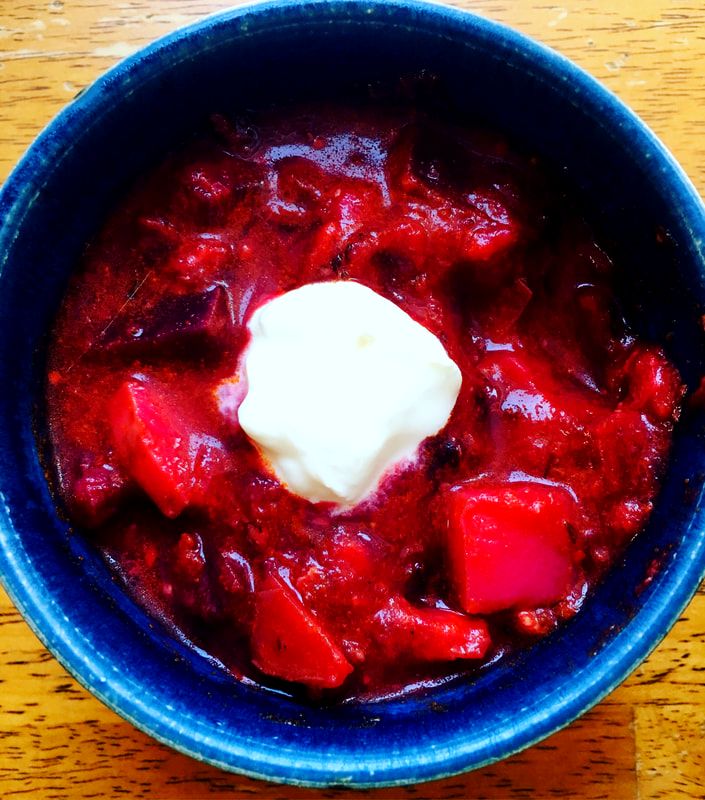 Beefy Beet Borscht with Bone Broth
Serves 6-8 For the broth: 3 lbs beef soup bones, with plenty of meat on them 6 quarts water 1 sprig fresh rosemary or other fresh herb such as thyme 2 Tbs apple cider vinegar 3 bay leaves 2 tsp sea salt Fresh black pepper Combine ingredients in a slow cooker and set to low. Let cook for 24 hours. Let cool, then remove the meat from the bones and set aside. Strain the remaining broth to remove bones and herbs. Refrigerate until ready to use or immediately make into soup using recipe below. For the soup: 2 Tbs butter or other cooking fat like tallow or lard 1 large yellow onion, diced 4 cloves garlic, minced 2 lbs beets, scrubbed and diced 1 lb potatoes (I used red or blue), scrubbed and diced 3 quarts beef broth, made with soup bones (see above) 1-15 ounce can diced tomatoes 2 Tbs tomato paste 1 ½ tsp Hungarian paprika 1 tsp ground cumin 2 tsp dried dill 1 ½ tsp sea salt Freshly ground black pepper Meat from soup bones (if using store-bought broth, sub 1 lb cubed stew meat) To garnish: full-fat sour cream and fresh dill In a medium stock pot, heat the butter over medium heat until melted and bubbly. Add the onion and garlic; sauté 5-10 minutes until softened and translucent. Add the beets and potatoes, cooking for 5 more minutes. Add the broth and bring to a boil. Cover and turn to medium heat; let simmer 30 minutes until the beets and potatoes become tender. If using stew meat, add at this time. Stir in the tomatoes, tomato paste, paprika, cumin, dill, salt, pepper and soup bone meat if using. Keep heat on low and simmer for 20-30 more minutes until the soup has reduced and thickened slightly. Season to taste and serve with sour cream and fresh dill. 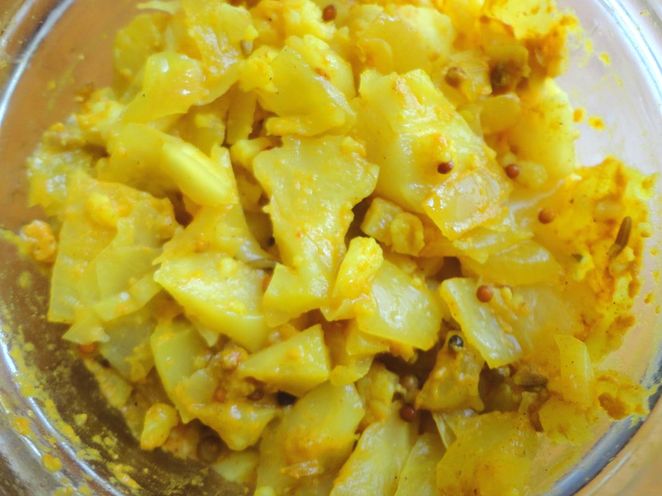 I am of course a fan of all things fermented, but it can be easy to get in a rut with making ferments, sticking to sauerkraut or kombucha and not venturing out into new ferment territory. This Curry Cauliflower-Onion Chutney is just the thing to mix up your ferment game. All sorts of condiments can be made into a lacto-fermented version, and this chutney is a great one to start with. This recipe can be lacto-fermented just using the salt method like sauerkraut or can be made by adding whey, drained from probiotic yogurt . The whey acts as a starter culture to get the fermentation process started. You can make salsas, chutneys, sauces and relishes using whey as your starter, but you can also make them without, or substitute a dairy-free starter like sauerkraut juice or brine from pickled vegetables. Using the whey makes the fermentation happen more quickly, so the ferment will be done within a few days instead of a week or two. I like to ferment the veggies in larger pieces and then puree to my preferred consistency before using, as I find it is easier to keep the veggies submerged in brine. You can puree this as thin as you like, or leave it in larger chunks for more texture. 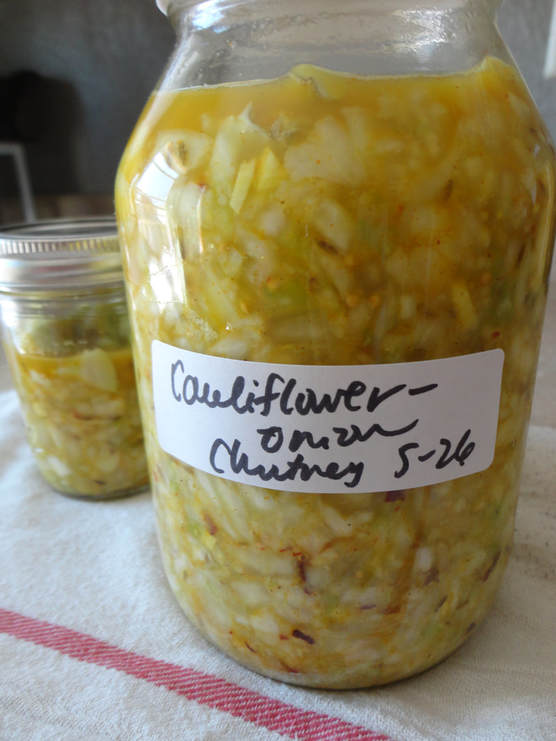 Cauliflower-Onion Chutney is stinky yet delicious and goes great in a variety of dishes. You can serve alone or add a scoop into plain yogurt for a quick raita to serve alongside your favorite Indian dishes. I suggest you try it folded into scrambled eggs with spinach and goat cheese then served with warm naan bread. Of course, simply added to a tossed salad would be great or even on a brat with curry ketchup. Get wild with this one! You can adjust the heat to your comfort level by increasing the amount of pepper flakes or throwing a fresh hot pepper in if you like. 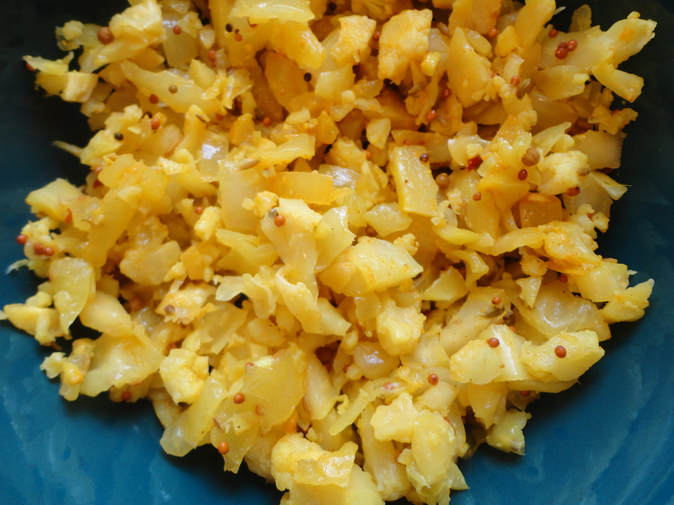 Lacto-Fermented Curry Cauliflower Onion Chutney
Makes ~2 quarts 3 cups cauliflower, finely chopped--about 1 head 1 cup green cabbage, finely chopped 1 large onion, diced (about 2 cups) 4-6 cloves garlic, minced 4” fresh ginger, grated 1 Tbs whole cumin seeds 2 tsp whole mustard seeds, black or yellow 2 tsp red pepper flakes 1 tsp whole coriander seeds 1 tsp fennel seeds 1 tsp turmeric powder ( or 1 Tbs fresh grated turmeric) 1 tsp curry powder 4 Tbs liquid whey or brine, optional ~2 Tbs sea salt Combine the cauliflower, cabbage, onion, garlic and ginger in a large bowl. Add salt, using the ratio of 1 tsp per pound of vegetables. Massage the salt into the vegetables until the are softened and produce an adequate amount of brine. Add the spices and whey to the vegetable mixture. You may want to use gloves if mixing by hand, as the turmeric will stain your skin. Transfer the mixture to a quart jar and tamp down with a wooden spoon to remove air and push up the brine. Place a weight on top of the mixture to keep the vegetables submerged in the brine. Add a non-reactive lid, not too tightly, and leave at room temperature out of direct sunlight. Ferment for about 3-5 days if using starter, or 10-14 days if not, until it has a slightly tangy flavor and fermented smell. For a finer, chutney-like texture, pulse several times in the food processor or blender to your preferred texture. Return to the jar and press down to push brine to the surface. Transfer to the fridge for storage, where it will keep for several months. 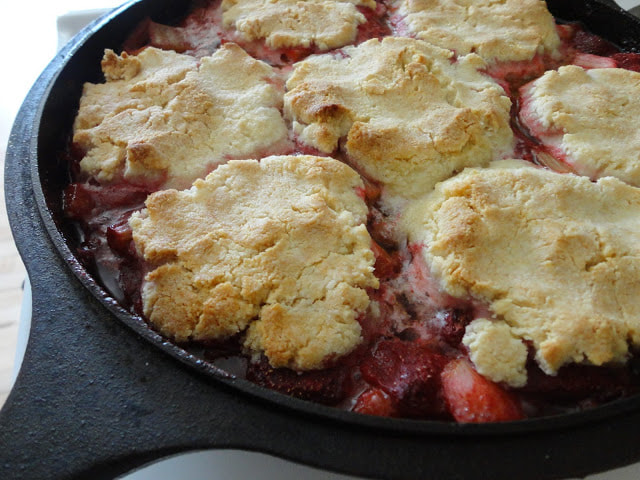 Strawberry-rhubarb is the quintessential early summer flavor combination. We have had rhubarb in for a while now, and now we finally have an overflow of strawberries around here, so naturally, a dessert is in order! I love mine served warm with some homemade vanilla ice cream or whipped cream. This is the perfect treat for the official first day of summer, with today being the summer solstice. I love making my cobblers in a cast iron skillet. It gives a really wonderful rustic look and bakes up really nicely.. You could totally make this recipe in a 9x9 square glass baking dish or pie pan, but I encourage you to try baking in cast iron for a change if you have a good skillet. Once you do, you probably will always want to bake cobbler that way. 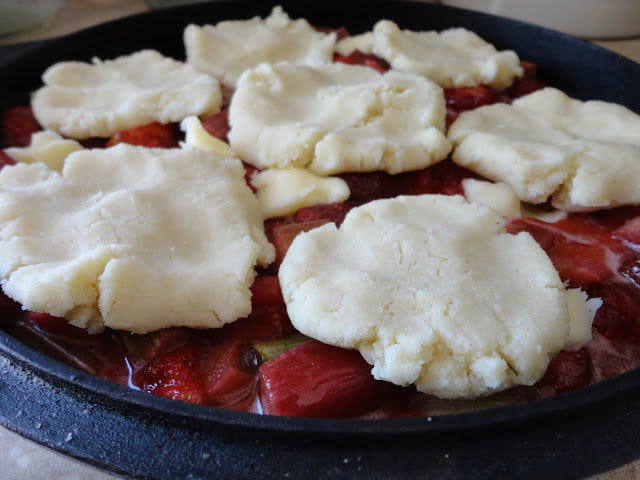 You can use frozen rhubarb or berries for this recipe if that's what you have available, especially if you put up lots of fruit in the freezer after harvesting! Skillet Strawberry-Rhubarb Cobbler (Gluten-Free/Grain-Free/Egg-Free) Serves 6 Prep time: 15 minutes Cook time: 40 minutes For the filling: 2 cups rhubarb, cut into 1" pieces 1 c strawberries, cut in half 1/2 cup honey or maple syrup 1 Tbs lemon juice 1/2 tsp vanilla extract 1/2 tsp cinnamon Pinch sea salt 1/4 cup arrowroot powder 2 Tbs butter Preheat oven to 350F. Lightly grease a cast iron skillet or 9" square glass baking dish. Combine filling ingredients, except the butter, together in a medium bowl. Mix well to dissolve arrowroot powder. Let sit and macerate slightly while you prepare the cobbler topping. For the crust: 1 cup blanched almond flour 1/2 cup arrowroot powder 2 Tbs coconut flour 1/4 tsp sea salt 1/2 tsp baking soda 4 Tbs butter, chilled and cubed 2 Tbs honey 2 Tbs cold water Combine almond, arrowroot and coconut flours. Add salt and baking soda and mix well. Cut the butter into the flour mixture until well combined and it begins to resemble wet sand. Add in the honey and water and mix with your hands until the dough just comes together. Pour the filling into the prepared pan. Spread out to create an even layer. Dot the 2 Tbs of butter evenly along the top of the fruit filling. Separate the cobbler dough into 7-8 pieces, and create biscuit-like pieces of dough. Set over the top of the fruit filling to create a "cobbled" together crust appearance. I like to make mine into a circle with one in the middle to make serving easier. Bake for 40 minutes, checking and rotating the pan after 20 minutes to ensure even browning of the crust. The crust should be lightly browned and slightly firm. The biscuits will still be a little soft, but will firm up as it cools. The filling should have gelled and cooked down, but will continue to gel and set as it cools. Let cool for about 30 minutes before serving to allow setting if you like yours warm, or wait a few hours to allow to fully set. Serve topped with ice cream or whipped cream for a real crowd-pleaser! Leftovers (why do you have leftovers??) can be transferred to a storage container and kept in the fridge. This should keep in the fridge for several days, but will likely be all eaten up before then! 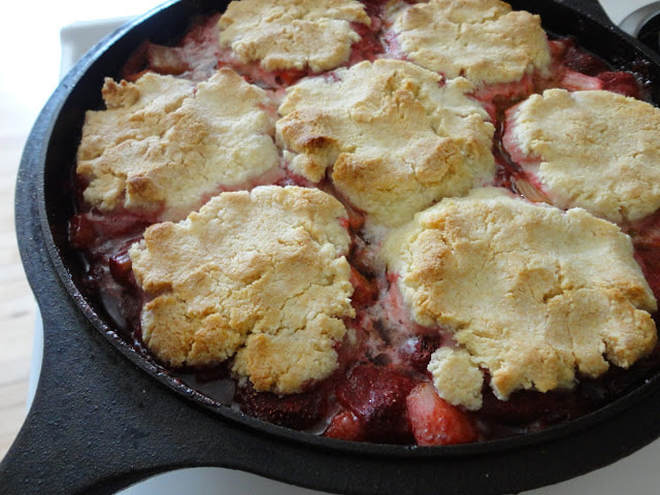 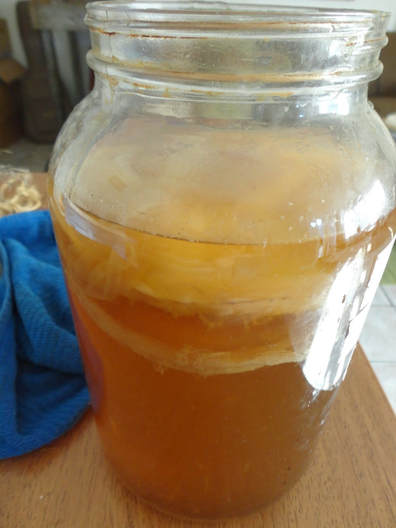 Kombucha, the fermented tea beverage, has become the darling drink of the health food world in the last few years. Health foods stores and conventional stores alike are carrying so many different brands and flavors, and the popularity of the drink seems to only be increasing. Kombucha is a fermented beverage, made by culturing a sweetened black tea with the kombucha starter, also known as a SCOBY (symbiotic colony of bacteria and yeast). The bacteria and yeast that are present in the SCOBY feed on the sugar, therefore facilitating fermentation. By ingesting kombucha, you get to consume lots of good bacteria and yeasts, even more potent than a supplement. This is good news for your digestive health, skin, and even immune system! The beverage also has a detoxifying effect on the liver, is high in antioxidants, and can improve stomach acid levels. Unfortunately for those who are already kombucha fans, these tasty beverages run at least 3 dollars for a 16 oz. bottle, so if your kombucha habit is anything like mine, it can get pretty expensive! That is why making your own kombucha at home is so wonderful; it is extremely cheap, pretty easy to make when you get the hang of it, and you still get all the health benefits. Plus, you can make any flavors you want and get creative in the kitchen. I use the continuous brew method of making my own kombucha. There are two basic methods, the other being the batch method. For me the continuous brew method is a lot easier, and I have found I get much better results, including a better tasting end product that has better carbonation. For this how-to, I will be giving the instructions for the continuous brew method, but if you want to try the batch method, you may try it and see if it is for you. For even more information of the how's and why's of kombucha making, check out the Kombucha Kamp website, which is full of great stuff on the topic! You can also purchase a SCOBY, or mother culture, on this website if you don't have a friend to give you one. To make your kombucha you will need a one gallon jar, and it is best and easiest to use one with a spigot, like a sun tea jar, and some bottles for after its brewed. I use flip-top bottles often used in home-brewing beer for the second fermentation, which you can find online or at home brew stores. You will also need loose leaf black tea, organic evaporated cane juice, and filtered water. 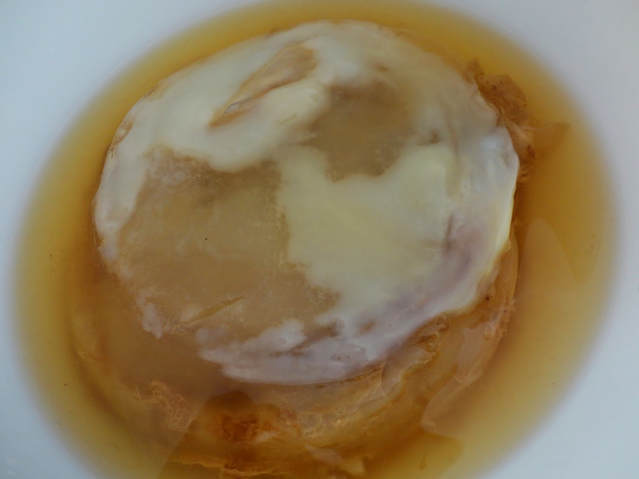 Step 1: Obtain your starter culture If you already know someone who brews their own kombucha, you can easily get a "mother" culture from them. Each time you brew a new batch of kombucha, a new scoby (the big, gelatin-like form) will grow. You only need one scoby for a gallon batch of kombucha, so the new ones can be given away to others to start their own home brews! If you can't get one from someone you know, you can get them online from Kombucha Kamp or Cultures for Health. Do not use a starter culture that has been dried/dehydrated. Fresh is the best, and preferably one that has not been refrigerated. You can also use a bottle of plain, unflavored kombucha that is store-bought as your starter culture if you can't find one anywhere else--but be sure it has no additives and has not been pasteurized! If you already have a scoby and some kombucha (this is your second time through the process, perhaps), then you remove the scoby with clean hands and set it aside in a bowl, along with 1 cup of the kombucha tea, which will be your starter liquid. This will work to inoculate the sweetened tea to start the fermentation process. Use the kombucha from the top of the jar for your next batch, and save the brew at the bottom for drinking this round. It has more yeast in it, so the new culture will grow better from the stuff on top and the kombucha at the bottom will produce better fizz. This is why having a spigot is so nice. Not only is it easier to get your tea out, but you also pull from the bottom, and leave the tea at the top for the next batch. If you only have a basic glass jar, that is still totally fine to use. Once you have set aside a previous culture or have your new one ready, have a clean 1-gallon jar ready. No need to sterilize the jar, just a clean glass jar will do--never plastic or metal! Step 2: Brew Tea The tea is important to the brewing process because of the pH level and tannins it lends to the process, which help facilitate fermentation. I have found black tea to work best, and it is said to be the most traditional tea to use, as opposed to the green tea and honey variation, Jun. Some people have success with a blend of black and green tea, but I have found plain black organic tea yields the best results. For 1 gallon of kombucha, I use 2 heaping tablespoons of organic loose leaf black tea. To brew your sweet tea, bring 1 quart of filtered water to a boil and add the loose tea. Remove from heat and cover. Let steep 8-10 minutes. Brewing the tea too long can leave it bitter, so keep an eye on your steep time. Strain the tea into the empty gallon jar. Step 3: Add Sugar Please don't let this step scare you, or deter you from making kombucha all together. The sugar is for the bacteria and yeast to do their jobs, not for you! Bacteria need simple sugar to survive, and straight up evaporated cane juice is the best way to go for this ferment. Add your sugar, 2/3 cup-1 cup for a gallon of kombucha, to the strained hot tea. Stir well with a wooden spoon--not metal or plastic spoons--to dissolve the sugar completely. Then, add the rest of your water to dilute the tea to the normal strength. Leave a few inches of room at the top for your starter liquid and scoby. Fill the rest of the jar with cool water, leaving 2-3" headspace at the top for the scoby and starter. By heating a smaller amount of water then diluting the tea to the proper strength, it takes almost no time to cool to room temperature before adding the scoby--if you add a scoby to hot water, it will kill it. 4. Add SCOBY and Starter Liquid to Sweetened Tea Now that the tea is cooled, you can add the scoby culture and starter liquid. The starter needed is 1 cup of prepared kombucha tea from previous batch or, if this is your first batch, whatever came with your SCOBY. If you don't have this, you can use 1 cup of store-bought plain kombucha. Simply add the starter and scoby gently into the prepared tea and cover with a clean cloth or towel. Tie a string around the top to keep the cloth in place, or use a rubber band. This keeps out bugs and dust and such, but lets the natural bacteria and yeast in to help populate your tea. Be sure to use a towel with a tight weave for this; if you try using cheese cloth or a towel with a loose weave, fruit flies and mold will most likely make a home in your brew. 5. First Fermentation This is the easy part, because it is just waiting! The first fermentation lasts about 1 week. Place your brewing kombucha in a warm place, that is relatively dry and out of direct sunlight, and leave it alone. No need to mess with it, stir it, jostle it. Just leave it alone for 5-7 days. After 5-7 days, you can taste your kombucha and see if it is at the right stage for you. If it is too sweet, let it ferment for a few more days. If it is too sour or tart, it is not ruined, but you might not enjoy it as much, then you know to reduce the time you let it ferment next time. This can depend a lot on temperature and humidity in your house, so you may have to experiment at different times of the year. In the warmer months, this will go more quickly than in the cooler months. If your house is always climate-controlled at the same temperature, then 7 days will be about right. 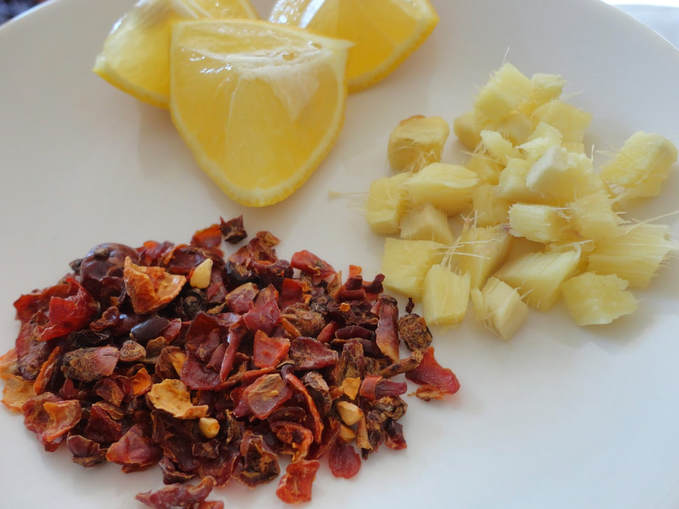 6. Second Fermentation Now it's time to bottle the kombucha and get it all bubbly and tasty. If you like the kombucha as is, feel free to just drink it now. You may want to refrigerate it for better taste and more refreshment, but it isn't necessary. However, if you want your kombucha to have that wonderful carbonation--which makes it a great substitute for soda or even beer--then this step is important. To get the best carbonation, I use flip-top amber bottles, but used kombucha bottles from store-bought brands will substitute well. At this point you also add your flavorings. You can add about 2 tablespoons of fruit juice or fruit puree, pieces of whole fruit, fresh ginger or even your favorite herbs. I like to keep my flavorings to 2 Tbs per 16 oz. bottle, so you still get that nice kombucha flavor. Add whichever extras you're using to your bottles before adding the kombucha to the bottle, however, so you know you leave yourself with enough room in the bottles. Some of my favorite combinations are Rose Hip-Lemon-Ginger, Elderberry-Hibiscus-Orange Peel, Concord Grape, and Watermelon-Mint. If you have a jar with a spigot, simply decant enough kombucha into your bottle to fill it all the way to the top. Top with the lid and set aside. Repeat again until all the kombucha is used. If you don't have a spigot on your jar, you can take the scoby and 1 cup of liquid off of the top with a ladle, then use a funnel to pour the kombucha into the individual bottles. For this, look for a small funnel that will easily fit into the opening of your bottles. Once you have flavored and bottled your kombucha, then you get to just let it sit again. I usually leave mine for about 3-5 days, until they are fizzy to my liking. You can check yours after about 3 days and test them, and leave them to ferment a little longer to get them more carbonated. Because this is the continuous brew method, be sure to save 1 cup of brewed kombucha from the top as your starter liquid for your next batch! Once you have completed this step, you are ready to restart the process back at step one with your scoby! 7. Refrigerate and Enjoy! I like my kombucha chilled, which I think makes it a really refreshing drink. You don't have to refrigerate it before drinking, but I recommend it. Once they are stored in the fridge, your bottles of kombucha will last several months--though you will likely drink them before then! 4-8 ounces a day is a good serving of regular strength kombucha for most people. This process is continuous, so you repeat it each time you pour one batch into bottles. Never leave kombucha scoby without sweetened tea in it for long periods of time, more than a few days, as this is its food and it can die without it. If you need or want to wait a few days before starting a new batch, just leave the scoby and the starter liquid in a covered jar, but do not refrigerate. Leave at room temperature until ready to start a new batch. Don't forget to give away your newly-formed scoby's from each batch to a friend, or start another gallon of kombucha with it, as you only need one scoby per gallon of kombucha. You could have a little kombucha hotel going with lots of jars! If you don't want to make more, however, you can just compost the scoby as well. Continuous Brew Kombucha Kombucha has been a health food staple for several years now, and it not just because it tastes so good! This drink is full of probiotics, as well as organic acids that help promote detoxification, digestion, improved immune system function and even better skin. This is the perfect alternative to pop or other sweet drinks and is great for all ages. You can make this all your own by adding your favorite fruit juices or other flavors during the second fermentation. 1 starter culture (aka SCOBY or mother culture)
1-2 cups starter liquid (ready made kombucha tea) 4-6 tsp black tea 3⁄4-1 cup organic sugar 1 gallon filtered water Add ins: fruit juice, ginger, herbs, rose hips, lemon, berries, etc. Directions: Set aside SCOBY and starter liquid in a small bowl. Bring 1 quart of the filtered water to a boil and add the tea. Let steep 10 minutes. While the tea is steeping, add the sugar to your fermentation vessel. A sun tea jar or other glass jar with a spigot is ideal, but any 1 gallon glass jar will do. When the tea is steeped, strain and add to the sugar. Stir well to dissolve the sugar. Add the rest of the filtered water, leaving a few inches of room at the top to add in your starter. When the tea is at room temperature, add the starter liquid and mother culture. Cover your container with a clean cloth and secure in place using a string or rubber band. Let sit in a dry place out of direct sunlight for 7 days. After 1 week, you are ready to bottle for the second fermentation. You will need six 12 ounce bottles. Add your flavorings, such as 2-3 Tbs of fruit juice or 2-3 tsp of dried herbs to your bottles. Pour off the prepared kombucha into each bottle, filling to the top. Add your lid and close tightly. Let sit another week on the counter. This will let the kombucha carbonate and get that nice bubbly fizz that people love. I re-use amber bottles from store bought kombucha, or you can buy flip top bottles for bottling, which give the kombucha lots of fizz. Save 1-2 cups of the prepared kombucha tea to use as the starter for your next batch. Set this aside, along with the mother culture. If the SCOBY has produced a second mother, you can separate them and make a second gallon or give away to a friend who wants to try kombucha making! Do not let the SCOBY get too large, or it will make your kombucha too acidic and won't have as pleasant of a taste. Start the process over again with the new starter liquid and your SCOBY. You will be making a new batch once per week or so. 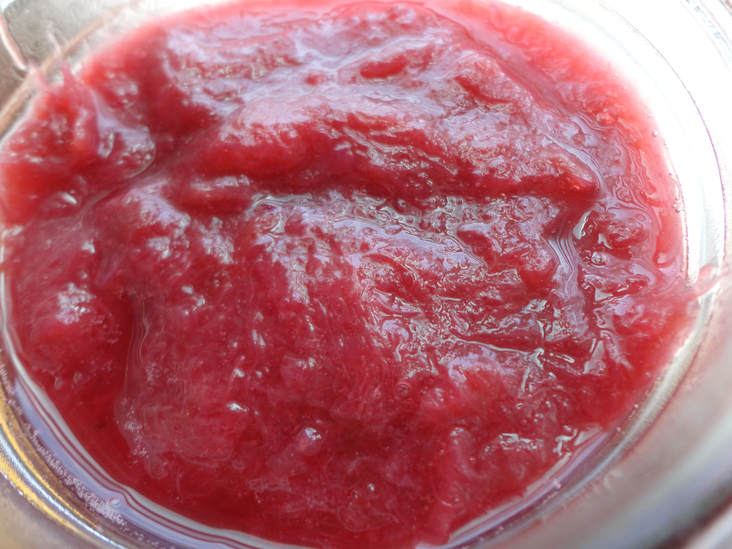 An abundance of rhubarb is never a bad thing. You can make pies, cobblers and crisps with it, ferment it into a tasty shrub or add it to tangy bbq sauce in lieu of tomatoes. You can even slice it a freeze it if you really get overloaded and just can't make enough rhubarb treats in a week. One of my favorite ways to get my rhubarb fix this time of year is to make it into rhubarb preserves. No strawberry to overshadow it, just straight-up rhubarb sweetened with honey and brightened up with a hint of lemon. This super easy recipe can be made in a larger batch and frozen as well, so you can enjoy rhubarb later in the year when it is all over. 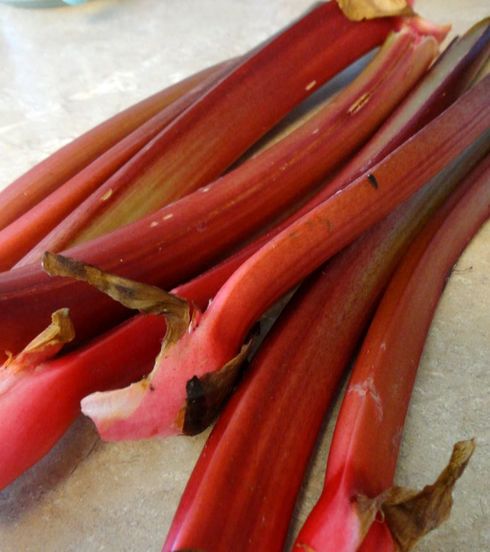 My favorite thing about this fruit spread is probably its beautiful pink color. Of course, it tastes delicious, too, but the color is something to behold. You will have to make this in real life to see it, as a picture just doesn't do it justice. The honey adds a great flavor and sweetness to balance out the tart and bitter qualities of the rhubarb. To keep some of the nutritional value of honey intact, I add it in two stages. First, the honey is added during cooking to thicken the preserves and second, it is added after cooking to round out the sweetness and maintain the nutrients of raw honey. Use good quality, raw and local honey for this recipe, as the flavor it imparts is just as important as its sweetness in this recipe. Stop by your farmers market or health food store for the best honey. I love this spread on sourdough toast with butter, as the "J" in a PB&J, swirled into full-fat yogurt, or paired with a creamy cheese like chevre or brie to go with crackers. Play around with different combinations to see how you like it best, you can't go wrong. 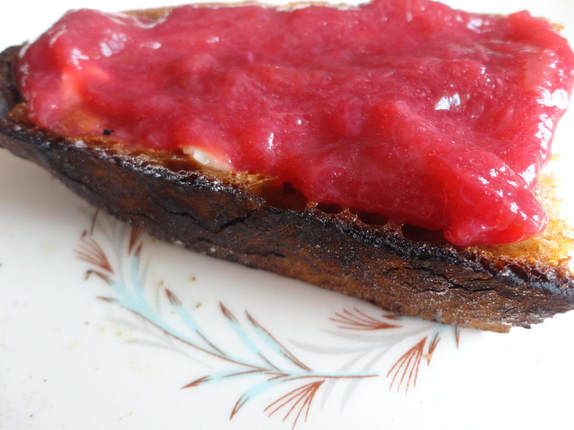 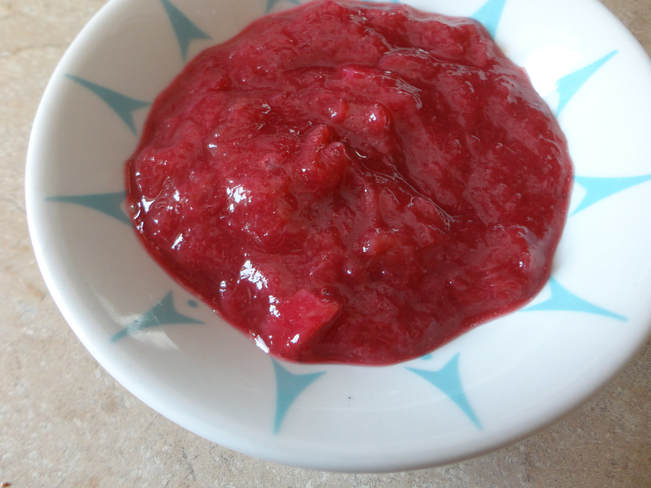 Honey-Sweetened Rhubarb Preserves Makes 1 1/2 pints 6 cups sliced rhubarb 1/2 cup honey (can sub maple syrup) 2 Tbs lemon juice 1/4 cup honey 1/4 tsp sea salt Combine rhubarb and 1/2 cup honey in a medium pot over medium heat. Heat until the rhubarb begins to release its juices and bring to a boil; reduce heat to low. Let simmer for about 30 minutes, stirring regularly, until the rhubarb has cooked down and the mixture has thickened to preserve consistency. Remove the pan from the heat and stir in the remaining 1/4 cup honey, lemon juice and sea salt. Adjust sweetness to your preference if needed. Let cool for 10-15 minutes and transfer to glass jars. Keep refrigerated until ready to use; this will keep for several weeks in the fridge. Once fully cooled in the fridge, you can transfer to the freezer for longer-term storage, where it will keep for several months. 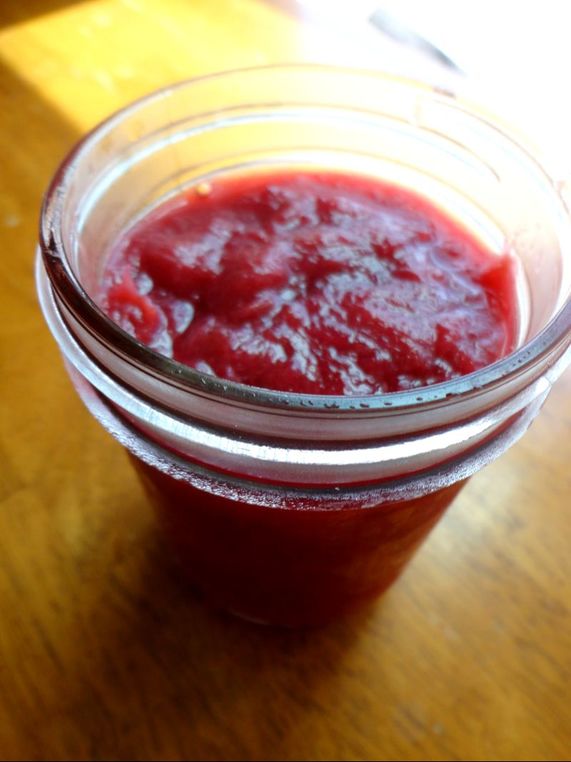 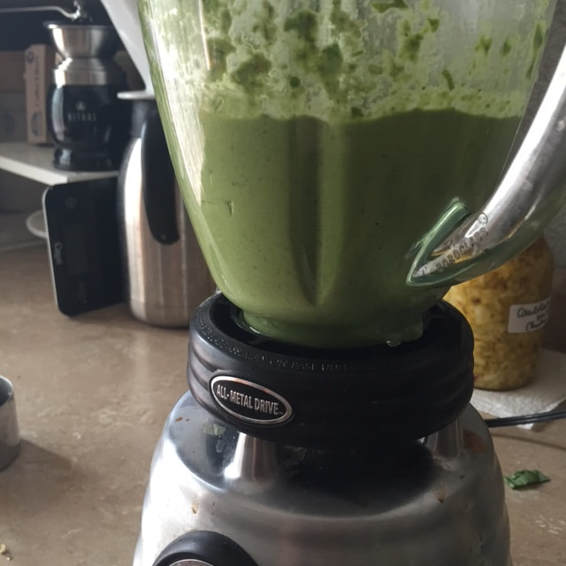 Spring is waning and giving way to hotter days and summer time, so ramp season is coming to an end. If you are unfamiliar with ramps, they are a wild onion that can be foraged in the spring, that have a pungent flavor reminiscent of garlic and leeks. You can use the whole plant, including the bulb or just the green leafy tops. To use up what I have left, I like to throw my end-of-season ramps into sauces like my chimichurri sauce or into scrambles and hashes. One of my favorite sauces to make with ramps is Ramp Pesto. For this recipe, I use the whole ramp, bulb and all, but if you only forage the green tops, you can just use those as well. 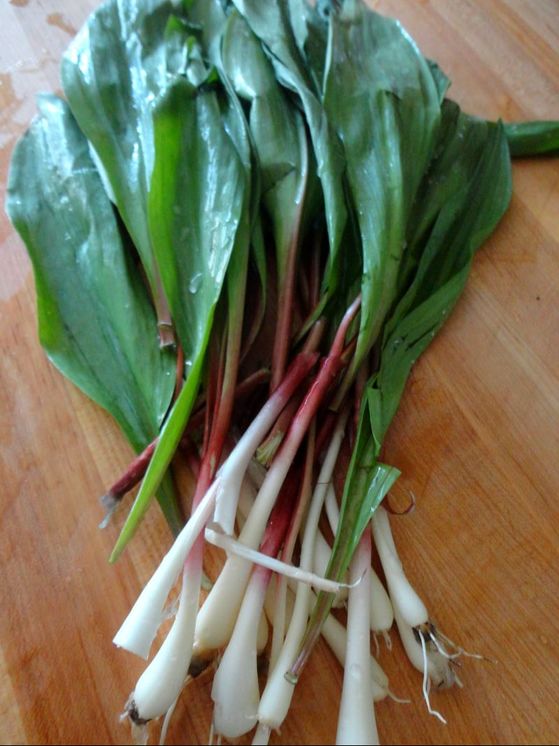 This pesto is potent and flavor-packed due to the high percentage of ramps to basil, so a little goes a long way. You can put this on pasta, sourdough grilled cheese, scrambled eggs, asparagus, mix into mayo, or just about anything that you want to add a pop of flavor to or anywhere you would normally use pesto. You could easily double or triple this recipe to make a big batch to stick in the freezer for spring time flavors all year long! 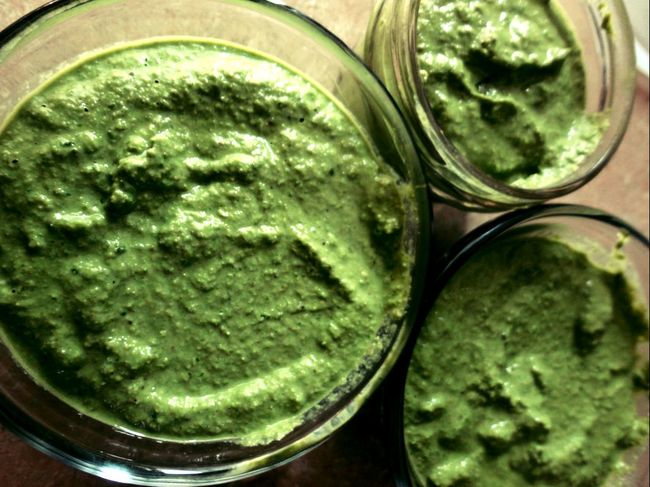 Ramp Pesto
Makes 2 cups 2 cups ramps, chopped and packed 3 cups basil, chopped and packed 2-4 cloves garlic, minced Zest and juice of 1 lemon (1/4 cup lemon juice) 1/2 cup chopped walnuts or pine nuts 1/2 cup shredded parmesan cheese 1 tsp sea salt 1/2 tsp freshly ground black pepper ~1/2 cup good quality extra virgin olive oil In a blender or food processor, combine the ramps, basil, garlic, lemon, salt, pepper, walnuts and cheese. Pulse several times until the large pieces are broken up. With the blender running, stream in the olive oil gradually until the pesto becomes smooth, which is about a 1/2 cup. Transfer to glass jars and refrigerate until ready to use. This will keep for several weeks in the fridge. You can also put in freezer-safe containers and freeze for long-term storage, where it will keep for several months.  The flavors of Thai cooking are some of my favorite to use in the kitchen, especially in the summertime. Ginger, lemongrass, lime, chilis and fish sauce can be added to just about anything and I'm going to love it. These lettuce wraps give you the awesome flavors of Thai cooking in an easy to prepare form. These are perfect for an appetizer to a Thai-inspired feast or for a summer potluck. They come together quickly and are a total crowd-pleaser, especially for the gluten-free folks you may be serving. 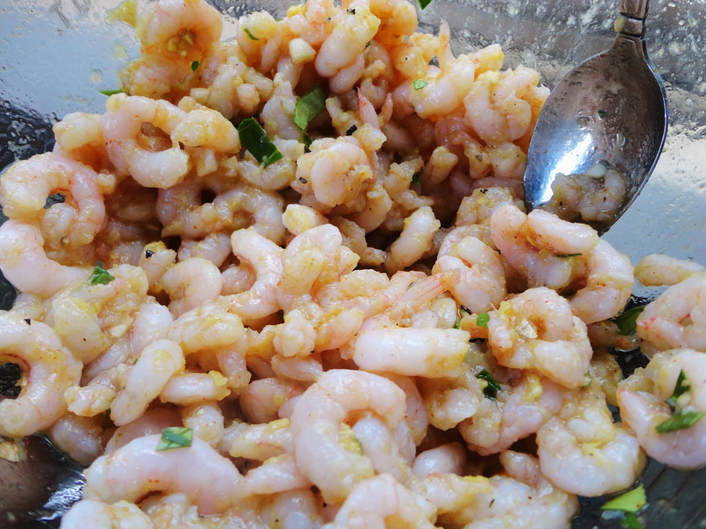 I used wild-caught shrimp, but you could really use any meat or seafood you like in these if you don't have good shrimp available or you have an allergy. Shrimp are wonderful because they are a source of selenium and iodine to support thyroid health, as well as the super antioxidant astaxanthin. Astaxanthin is anti-inflammatory and has been linked to improvement in eye health, heart health, immune boosting and even increased energy. This is where shrimp, and other foods like salmon, get that characteristic pink color. The pigmentation astaxanthin provides isn't easy to come by in many foods, so including shrimp, salmon, crab and lobster regularly is important. Plus, shrimp are a good source of cholesterol, needed for healthy hormone production and modulating inflammation. To make preparation much easier, I used precooked and peeled small pink shrimp that were wild-caught, but you could cook the shrimp yourself, especially if you have a fresh, local source. A note on buying your shrimp: look for wild caught in the US. Check the label for "Northwest caught" or "bay shrimp" if you can't get totally wild caught. Avoid wild or farmed fish that is imported, as there are questionable fishing practices done in other parts of the world for catching shrimp that are not good for the environment. The shrimp may be caught in highly polluted and contaminated waters, which could be passed on to the consumer, so these should be avoided. Look for shrimp from the Oregon coast or other sustainably caught source if you can. Since I live in a landlocked area, I am sure to read labels and check sources, as I can't just go to a fish market. 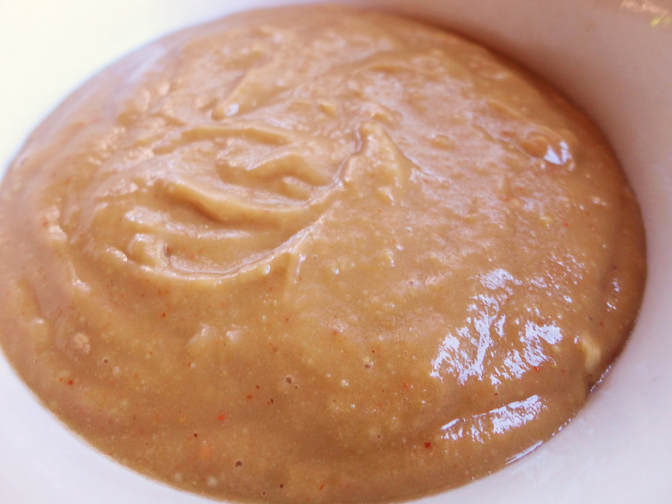 If you want to get ahead of the game, you could make the filling for these one day ahead of time and the filling 2-3 days before serving. Also, if you are paleo or nut-free, you can make the dipping sauce with sunflower seed butter instead of peanut butter with equally delicious results. I have done this before and it comes out seriously tasty, so someone with a peanut allergy would love you for bringing that variation to your next potluck. Thai-Style Shrimp Wraps with Peanut Sauce Serves 6 1 lb wild caught pink shrimp, cooked and peeled 1 Tbs fish sauce--I used Red Boat brand, it is the best! 1/2 Tbs soy sauce or coconut aminos for soy-free 1 Tbs green curry paste 1 Tbs raw honey 1/4 cup lime juice Zest of 1 lime 1 tsp--or to taste--chili flakes 1/4 tsp black pepper 1/2" ginger, grated 2 cloves garlic, minced 1/4 cup cilantro, minced Optional: 6 kaffir lime leaves, minced In a medium bowl, whisk together the ingredients, except the shrimp, until well combined. Add in the shrimp and stir to coat. Refrigerate about 1 hour before serving. To assemble: 1 recipe Peanut Sauce (below) 12 leaves romaine or butter lettuce 2 carrots, grated 1 cup cilantro, chopped 1/2 cup green onions, sliced Extra lime for garnish Place a small scoop of shrimp filling into each lettuce leaf. Top with prepared veggies and squeeze extra lime on top. Serve drizzled with sauce or place the sauce in a dish on the side for dipping. Serve with extra lime wedges and Sriracha sauce on the side for garnish. Keep chilled until ready to serve.  Thai Peanut Sauce
1/2 cup peanut butter ( or sunflower seed butter for peanut-free/paleo) 2 cloves garlic 1/2" ginger, chopped 2 Tbs fish sauce 1Tbs soy sauce or coconut aminos 2 Tbs coconut sugar 1 tsp chili flakes--or to taste 2 Tbs lime juice 1/4 cup water 1 Tbs cilantro, chopped 2 Tbs scallions, sliced Place all ingredients in a blender or food processor and puree until smooth. Transfer to a sauce pan and let come to a simmer. Turn to low and let cook 8-10 minutes until it has thickened and becomes slightly darker in color. If it becomes too thick, simply whisk in water a few tablespoons at a time to reach desired consistency. This is really to your preference, so add water as needed. If making ahead of time, refrigerate until ready to use. When serving, you can serve it chilled or warm up before serving. If you make a double batch of sauce, this goes great on buckwheat soba noodles, fried rice, or veggie-filled spring rolls, which I highly recommend. 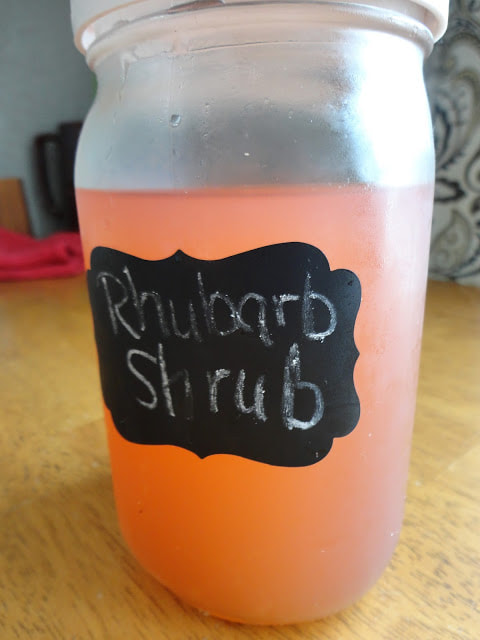 One of my favorite things to make with in-season fruit is shrub. A shrub, also known as a drinking vinegar, is a lightly fermented maceration of fruit and sugar that is combined with vinegar to create a beautifully acidic juice-like concentrate. This is a perfect springtime cocktail mixer or just a refreshing addition to sparkling water. Now that rhubarb is finally here in Southwest Wisconsin after a long winter, I want to put it in everything, and this shrub is a great place to start. Because rhubarb itself is bitter, it is balanced nicely with the sweetness of the sugar and brightness of the vinegar. 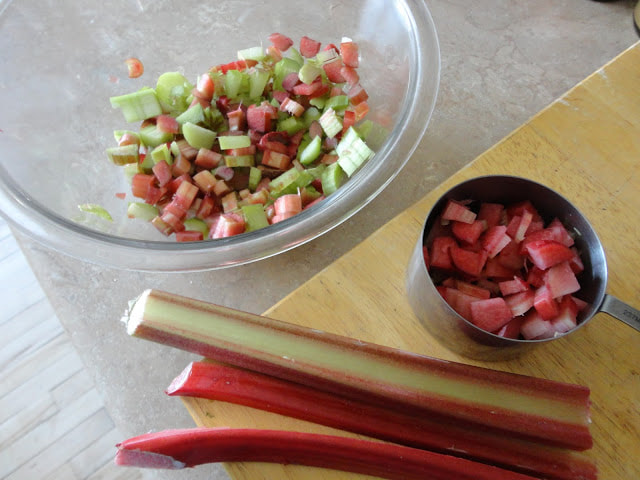 The process takes just over a week but, like most fermented things, almost all of it is waiting time. You can make a shrub with almost any fruit, such as berries or citrus, and it is a great way to use up lots of extra fruit when the harvest provides more than you can eat fresh. I used fresh rhubarb for mine, but if you have frozen rhubarb you have put up that will also work great. The rhubarb turns the shrub a beautiful pink color that makes any drink look amazing! The basic ratio I use for making rhubarb shrub is 1:1 rhubarb to sugar, and then 1: 1 juice (from the macerated fruit/sugar mixture) to vinegar, so this can be made in bigger or smaller batches as needed. Following the shrub recipe is a cocktail recipe I have been using to give you an idea of ratios using a shrub in a cocktail. 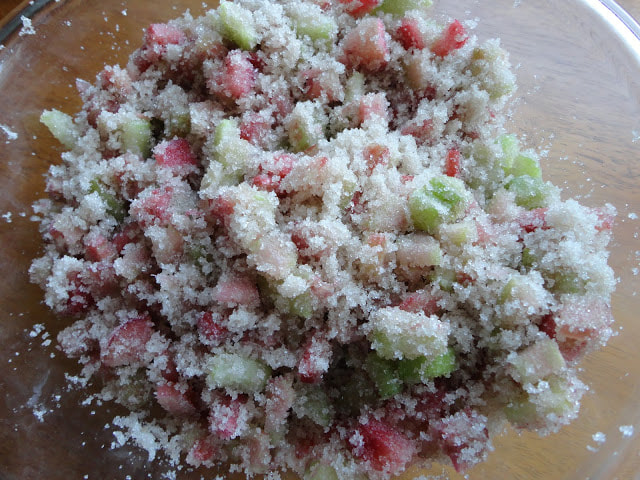 Rhubarb Shrub Makes 1 quart 4 cups rhubarb, diced into 1" pieces 4 cups organic evaporated cane juice 2 cups white wine vinegar (approximate amount, depending how much juice is produced) In a large bowl, combine the rhubarb and sugar. Stir well to begin dissolving the sugar. Cover with a cloth and let sit at room temperature. Each day, stir the juice and and sugar together to ensure all of the sugar gets dissolved and more juice is released from the rhubarb. This mixture is ready when it becomes bubbly and has produced a good amount of juice. It will have a slightly fermented smell to it, but be sure to catch it before it becomes too boozy smelling. At that point, yeast fermentation has taken over and it has become alcoholic, so discard and start over. When it is warmer, it will likely take only three days, and may take a few days longer if it is cooler where you are. Strain the macerated fruit through a mesh strainer. Press the rhubarb to squeeze all of the juice out. You will get approximately 2 cups of juice, but measure your end yield to get the exact amount. In a glass jar, combine the fermented fruit juice with the vinegar. Shake or stir well to combine. Refrigerate until ready to use. This will keep for 2-3 months in the refrigerator. Serve chilled in a cocktail or add to sparkling water for a soda-like treat.  Here is the delicious and refreshing cocktail I have been making with my rhubarb shrub, but experiment to see what flavor combinations you like best!
Rhubarb-Tequila Cocktail 1 oz. Rhubarb Shrub 1 oz. tequila, such as El Milagro 4 oz. organic ginger ale or your favorite flavored sparkling water(I use WiscoPop's ginger brew!) Ice cubes Fresh lime wedge Combine shrub, tequila and ginger ale in a cocktail glass. Add ice cubes to preference and garnish with a fresh lime wedge. 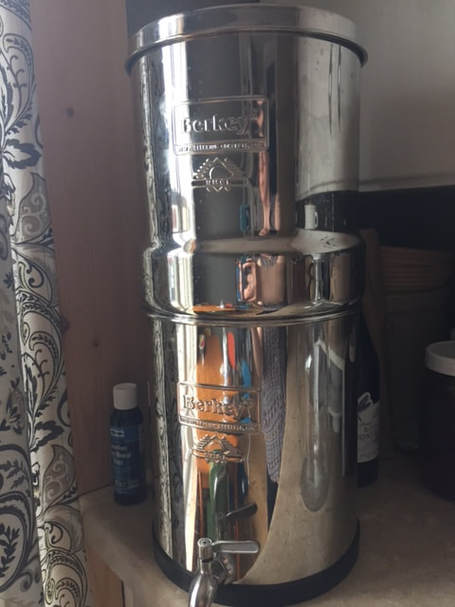 We have all heard all of the nutritionists, doctors, and other health experts always saying to "drink more water" for our health. It promises to be the panacea that will fix any ailment and lengthen our lives, but just the command to drink more does not necessarily mean we are getting all the health benefits we could from our water. Getting enough water is essential for health and is necessary for most functions in the body. But it is important to get the right kind of water. Just like many foods and products that have been tampered with due to modernization, water is not just "water" anymore. The water we drink is usually more than simply H2O. Tap water is processed and treated, and is full of byproducts and chemicals. Of course, this is a necessary evil when you live in a municipality, since clean water is needed to keep people healthy and alive. But this comes with consequences, as many things are added that are not conducive to health, and needs to be filtered to remove these additives. In this post I will go into the different types of water and filtration systems, rather than the amount a perosn should drink per day. To me, what kind of water you drink is therefore just as important as how much water you drink. The least optimal sources of water to consume are tap/city water and bottled water in plastic containers. The chemicals put into treated city water include things such as chlorine, flouride, over-the-counter and prescription drugs, including birth control pills and anti-depressants, lead and other heavy metals, and chemicals that run off from industrial farming facilities. Many of these have harmful side effects and are known carcinogens and endocrine disruptors. Bottled water in plastic bottles contains BPA, which has also linked to cancers including breast cancer and interference with endocrine function, affecting the balance of hormones in the body. The water in the bottled water is usually just filtered municipal water, so it is not very cost-effective, and all of that plastic is not great for the environment or our health. You can buy spring water in plastic bottles, but again, the plastic makes it a less healthful choice. 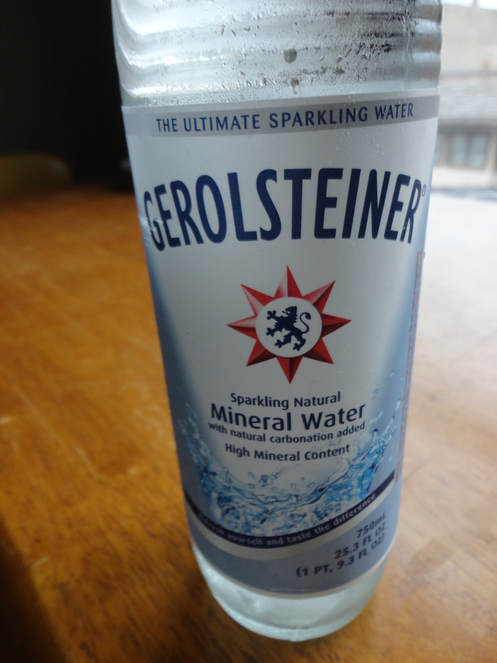 So what kind of water should you be drinking? If tap and bottled waters are not ideal for our health, then just what kind of water is the best? First off, I put this out there so you can make better choices for your health, not to add another thing to the list of health issues to obsess over. I know I can get carried away with health-related things, so let's do our best and not strive for utter perfection. Sometimes I drink bottled water when I have to and move on with life. We should really be thankful we have access to clean enough water to have these choices in the first place, as many people around the world are not so fortunate. However, the situation in our industrialized world is such, and this is an important part of our health which deserves some attention. If you are having problems with your health, looking at your water quality may lead to improvements in your well being. It really can be simple to add better water for you and your family, and it can be cost-effective, too. Making good water a part of your routine will eventually easier and less stressful to incorporate into your life, especially if you are used to getting all of your water from the tap. In addition to drinking water, you can also use a filter in the shower. I have a filter on my shower head to remove the chlorine. I find this helps with keeping my skin less dry, and it also promotes a healthy microbiome on your skin, as chlorine is anti-microbial. This is a nice option to at least have some extra filtration if the whole-house filter is not an option for you. I tend not to worry about the water I use for dishes, laundry, and household use, but I like this extra step in the shower or bath to help with my skin, which those with eczema, psoriasis or other skin conditions should consider. One option, if you don't want to purchase a filter, is to get filtered water from a health food store. This is usually very inexpensive, but does take the extra effort of hauling the water home. Be sure to put it into BPA-free containers if using plastic bottles or, even better, glass containers. This is better not only health-wise, but also for the environment, as they are re-usable. In addition to drinking water, you can also use a filter in the shower. I have a filter on my shower head to remove the chlorine. I find this helps with keeping my skin less dry, and it also promotes a healthy microbiome on your skin, as chlorine is anti-microbial. This is a nice option to at least have some extra filtration if the whole-house filter is not an option for you. I tend not to worry about the water I use for dishes, laundry, and household use, but I like this extra step in the shower or bath to help with my skin, which those with eczema, psoriasis or other skin conditions should consider. One option, if you don't want to purchase a filter, is to get filtered water from a health food store. This is usually very inexpensive, but does take the extra effort of hauling the water home. Be sure to put it into BPA-free containers if using plastic bottles or, even better, glass containers. This is better not only health-wise, but also for the environment, as they are re-usable. 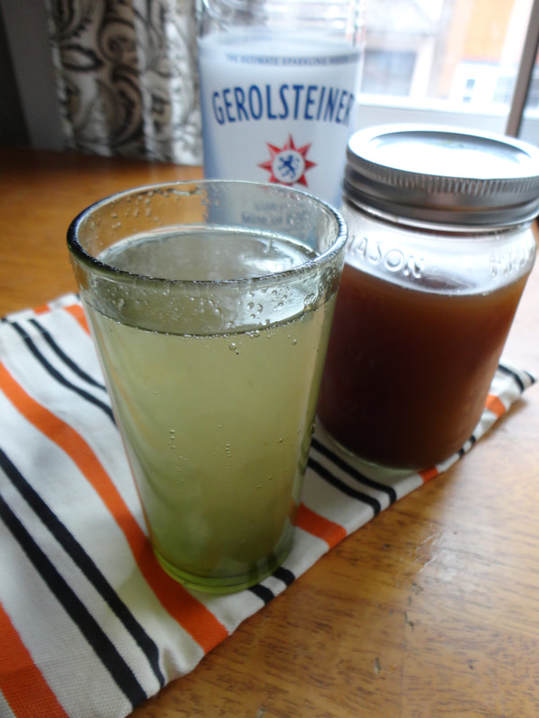 Mineral Water Store-bought mineral water is a great choice for drinking water. This is often bottled from a natural spring, so it not from a municipal source like most bottled water. I like this option as a compromise between bottles water for convenience and natural water for healthfulness. Look for mineral water bottled in glass containers if you can find it. Mineral water from the store is better than standard bottled water, especially if in glass instead of plastic. Because many come from springs, these contain minerals, making it such a great choice. These contain potassium, calcium and magnesium, which help to keep the body properly hydrated and the electrolytes in balance. I also like carbonated mineral water, which can be a good replacement for soda because of fizz and different taste that the minerals impart. Add a squeeze of lemon or lime or a splash of your favorite shrub mixer all make for awesome summer refreshers. I like Gerolsteiner brand mineral water, as it is sparkling and has a high mineral content, and it is independently owned, unlike the other larger brands like San Pellegrino and Perrier that are owned by Nestle. Natural Water Sources Spring water and well water, which come from naturally-occurring water sources, are both full of minerals, making the water optimal for hydration. These do not contain the industrial byproducts that are found in treated city water or chemical contaminants like prescription medicines. Both well and spring waters can be used in the whole house, for bathing and household use, as well as drinking. If you live in a rural area, hooking your house up to a well instead of city water could be very beneficial to you, and possibly more cost-effective in the long run. If you opt for a well as your water source, be sure to have your well water tested first for safety to use as drinking water. Many who are on a well will then filter this water with a carbon filter as a precaution to ensure extra protection from contamination. Spring water can come from a natural spring, or can be purchased after being bottled from the source. I love collecting my own water from a spring, as you get to spend time in nature, connecting with your source of nourishment. You also get extra movement in by hauling your water home and earthing from coming into contact with a natural, mineral-rich water source. When collecting water from a natural spring, also ensure that it is not too close to industrial farming areas to prevent contamination as well. You can get spring tested before consuming as well. If you are purchasing spring water from the store, look for BPA-free containers if possible, to keep it free of contaminants. Spring water is the original drinking water, so it is extremely nourishing and has such a great flavor. Some people use collected rain water, that they filter before drinking, as a natural water source. This is probably not the best option if you live in a city, as it can be polluted with various contaminants. If you do want to try this, please do your research on how to best filter and purify the rain water to make it a safe, clean water for drinking. Whatever kind of water you choose, do be careful to hydrate properly. Be conscious of getting enough water in your day and avoid over-hydration, a surprisingly common problem among health nuts. Getting enough water is essential for every function in the body, including keeping your blood pressure normal and your kidneys functioning properly, so it is all about balance. Getting too much water will often happen if you are drinking a lot of filtered water that lacks minerals which would normally balance electrolytes and maintain hydration. This is when drinking natural water becomes so important.
Drink when you are thirsty, as drinking too much can actually dilute electrolytes and lead to a lower metabolic rate. Having too little sodium can put stress on adrenal and thyroid glands. Drinking too much, especially with meals, can also dilute stomach acid, impairing digestion. I like to add a pinch of unrefined sea salt and little splash of lemon or apple cider vinegar so that my water is providing better hydration through more minerals and keeping my electrolytes in balance. What about you? What kind of water do you drink or filtration system do you use? Have you found an improvement in a health condition or your overall wellness by changing the water you consume? |

Brine & Broth
I am a gut health-focused nutritionist and online health coach based in Southwest Wisconsin. My recipes and philosophies center around traditional, nutrient-dense foods that support robust gut health. Archives
May 2022
Categories |
 RSS Feed
