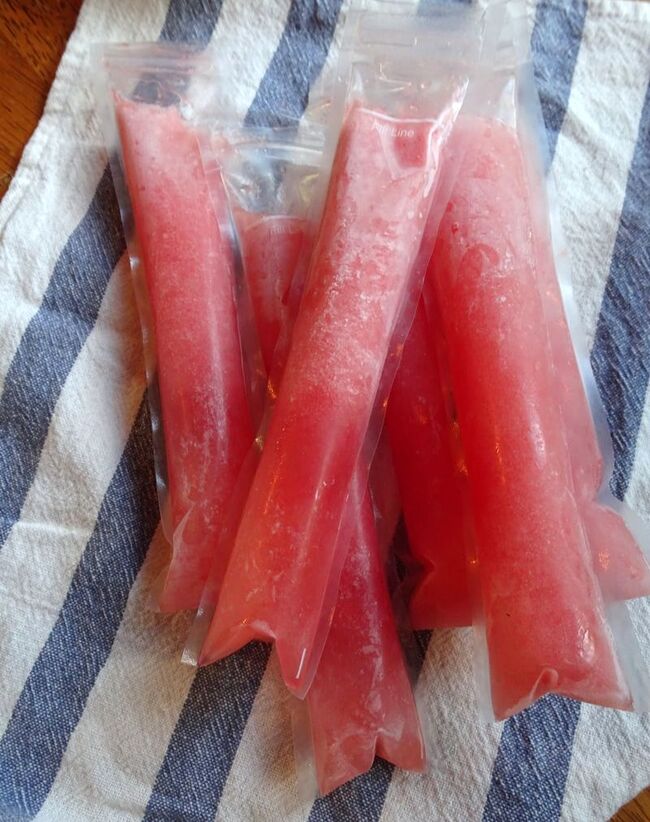
 Is there anything better than coming in from swimming or playing outside in the summer and cooling off with a popsicle? Well, that certainly has been our jam in the last few weeks, and I have been loving it--swimming and popsicles may be the only things keeping me sane in the heat, to be honest. Of course, we are not going to buy those store-bought freezy pops full of corn syrup and food coloring (the ones I loved as a kid), but instead, I made a healthy version at home to satisfy our popsicle cravings. The idea for the Watermelon Lemonade version of these homemade popsicles was a collaboration between the kiddo and myself (she was very proud!), and turned out not only to be delicious, but a super-hydrating recipe that is full of electrolytes in addition to delicious flavor. The watermelon provides potassium and the sea salt offers a bit of sodium, both helping to replenish us after sweating in the hot sun. If you use coconut water in lieu of water here, it adds even more electrolytes, including some magnesium as well. I bought these DIY Flav-R-Ice/Otter Pop/ice pop bags online ( I got the Zipzicle brand), which are essentially long, skinny zip-top bags that you fill and freeze. I thought they were so cool, I just had to try them. These were so easy to use and made me reminisce about eating the neon-colored ones in my childhood, earning them bonus points. You should certainly try this recipe, but you can also fill these homemade popsicle molds with so many other combinations, such as pureed fruit and yogurt, other fruit/citrus combos like I made here, or even straight up coconut water, which turned out amazing! I may have to try some adult popsicles, too, with some iced coffee or cocktail versions...stay tuned for that! 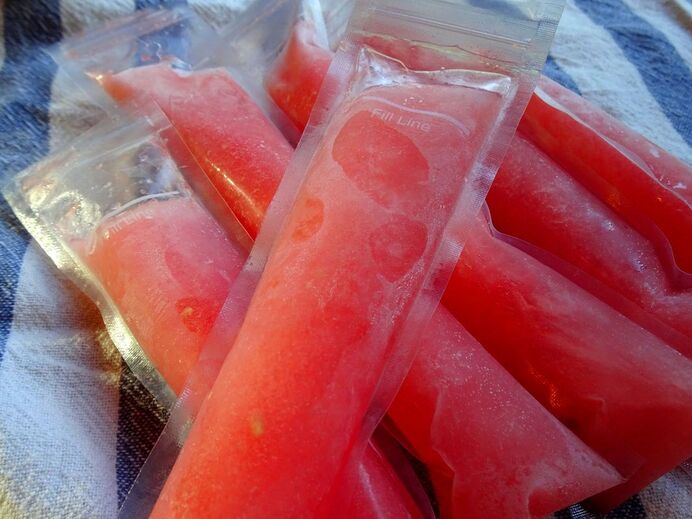 This was so nice to have something homemade and healthy as a summertime treat, but was also great as a project to make with the kiddo. She even wanted to make a recipe card of our collaboration, which is about as sweet as can be! If your family is looking for a little project, I highly recommend giving this recipe a try--they will love to fill the little bags and see them change as they freeze over a few hours! Stay cool and hydrated, have fun, keep boredom at bay...what's not to love? If you don't want to buy these ice pop-type of baggies, you can still totally make this recipe, just use any popsicle mold that you like. They also make silicone reusable versions of these ice pop molds if you prefer, although we washed and reused these zip-top versions a few times with no issues. Most popsicle molds hold much more volume, however, so you may want to double the recipe to make an entire batch if using a different type. Heck, you may want to double the recipe anyway, since these are likely to be eaten up quickly!  Healthy Watermelon-Lemonade Popsicles
Makes 6 Flav-R-Ice/Otter Pop-style popsicles Ingredients: Juice of 1 lemon 2 Tbs raw honey 1/2 cup water or coconut water 3 cups diced watermelon 1 big pinch of sea salt Optional: a few sprigs of fresh mint or basil Directions: Place all ingredients in a blender and puree until smooth. Pour into popsicle bags or molds up to the fill line. Be careful not to overfill, as the liquid expands as it freezes and can make the bag burst if overfilled (free science lesson involved!!). I used a small funnel to fill my bags, which made it a much easier, neater process, but is probably not a deal-breaker if you don't own one that fits in the bags. Put into the freezer, letting them sit upright as they freeze, for about 3 hours or until they are completely frozen. Then, enjoy and be thankful it's summer!
0 Comments
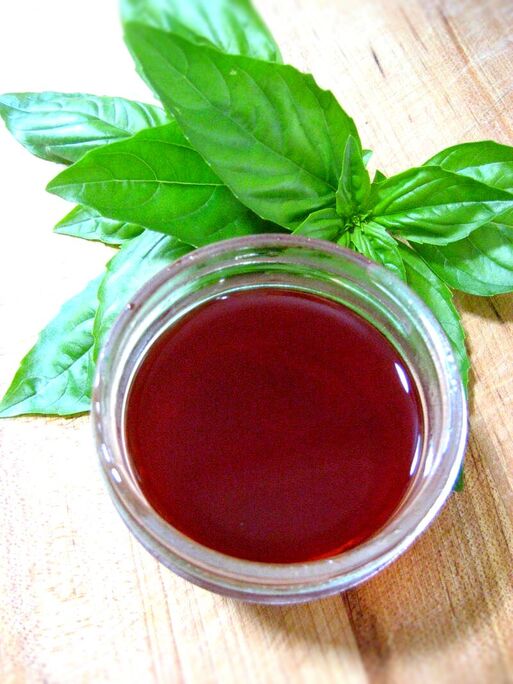 Some of my favorite flavors from summer are strawberry and basil, and these come together beautifully in this Strawberry-Basil Shrub. A shrub is a lightly fermented syrup that is commonly used in cocktails as a mixer. Also known as a "drinking vinegar," shrub is made my making a fruit-and-sugar syrup (some do this by cooking it down, but I make mine with a short fermentation) added to vinegar to make a sweet and tart elixir full of flavor. Shrubs are to be used as a concentrate rather than to be sipped on their own, which is why they are perfect for cocktails to add a pop of acidity and sweetness. For the non-drinkers out there, shrubs also go great splashed into sparkling water or added into a mocktail recipe. 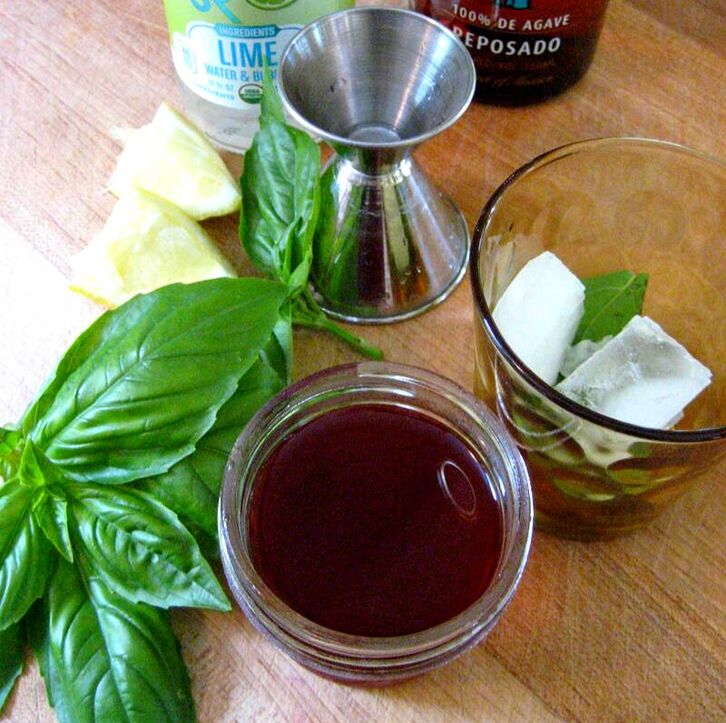 Shrubs can be made with any fruit, and I have made a tasty Rhubarb Shrub in the past that is a favorite around here, but you could use the same method with whatever fruit you have on hand. I love to make shrubs when I have some fruit that needs to be used up and is past its prime, but is still perfectly find to use. Other combinations I have made are pineapple-thyme, cranberry-ginger, raspberry, and apple spice. Since it summer is in full swing, I recommend blending herbs and berries to make the most refreshing mixer the season has to offer! Our garden gave us some beautiful strawberries and lots of fragrant basil, so this shrub was a no-brainer. 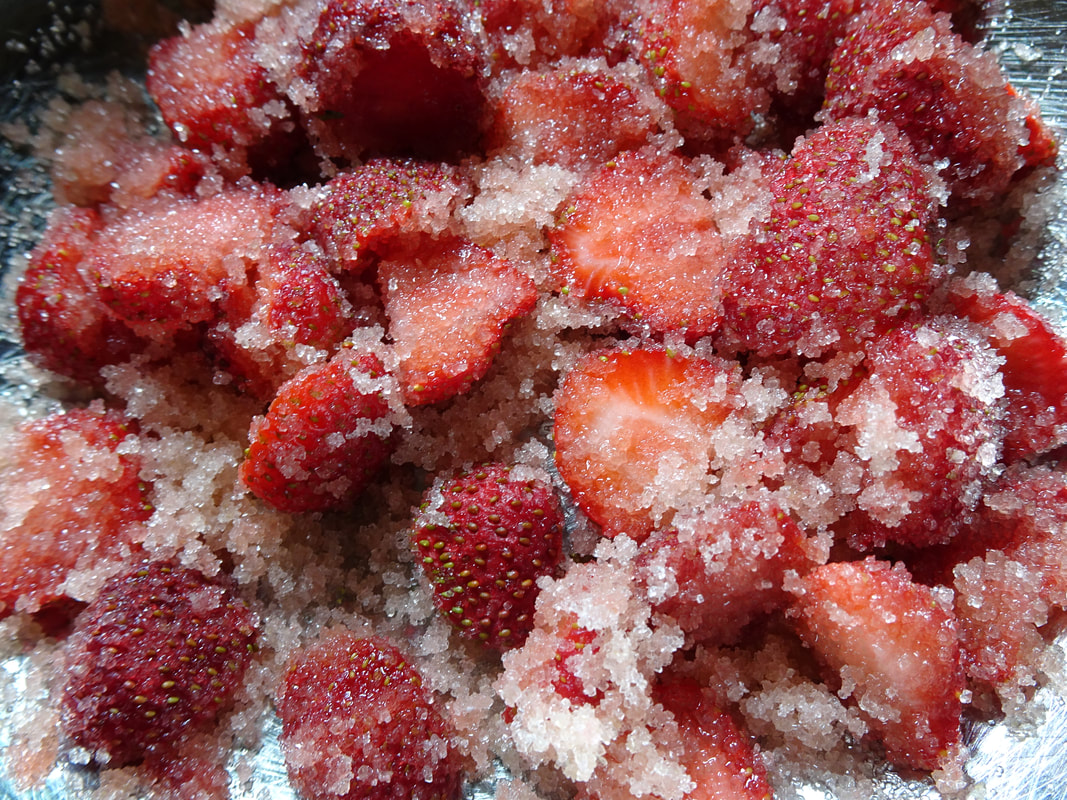 Strawberry-Basil Shrub Makes 2-3 cups 1 quart strawberries, sliced (about 4 cups) 2 cups unrefined cane sugar 1 cup white wine vinegar (approximate) 1 cup red wine vinegar (approximate) 1/2 cup fresh basil, roughly chopped and packed Directions: 1. Combine sliced strawberries and sugar in a mixing bowl. Stir well to coat the strawberries with the sugar. Cover the bowl with a cloth to allow air flow. 2. Let this mixture sit at room temperature for 3-5 days, stirring once or twice a day to dissolve the sugar and keep the berries submerged in liquid. Check for mold when you stir as well. 3. The fruit mixture will be ready once it shows early signs of fermentation. It should begin to bubble and start to have a lightly fermented, acidic smell. Be sure to not let this over-ferment, or it can become quite boozy and lose a lot of the flavor you want in your shrub. The fermentation may only take a couple of days if your kitchen is quite warm, or a few extra if you keep it cooler. 4. Strain the macerated and fermented strawberries through a fine mesh strainer, pressing to get out as much juice as possible. Measure this liquid, then transfer it to a glass storage jar. 5. Add the basil to the strawberry juice. Add the vinegar in the amount equal to the volume of the strained juice, half white and half red wine vinegar. You should get about 2 cups of juice from this, so you would then add 2 cups of vinegar total, with 1 cup each of the two types of vinegar. 6. Stir the mixture well and let sit, covered with a lid, at room temperature 2-3 more days to infuse with the basil. Strain and transfer to a glass storage jar. Refrigerate before serving. 7. This will keep for about 6 months in the fridge. Serve 1-2 ounces of shrub in with your favorite cocktails, mocktails, sparkling water or even iced tea. 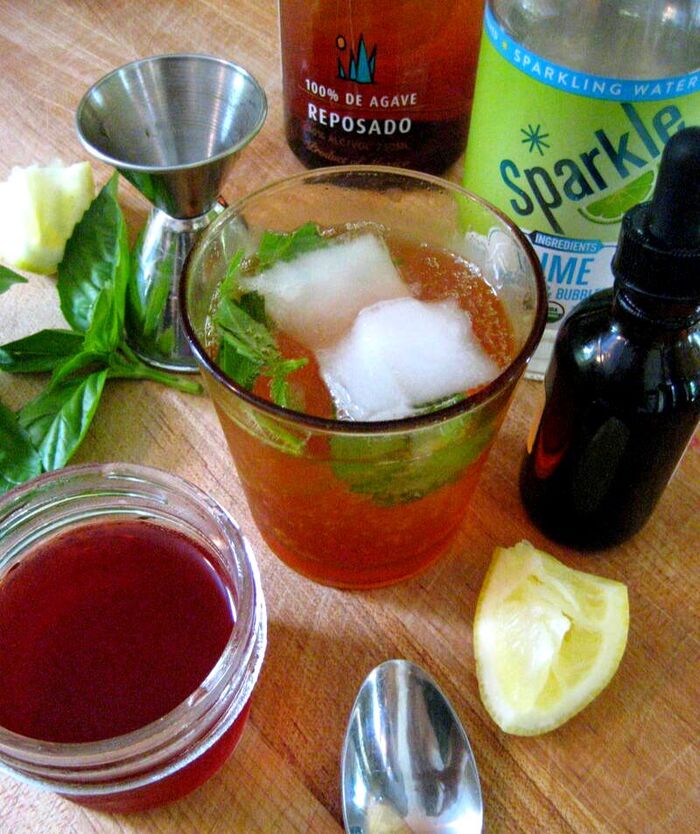 Sweet Summertime Strawberry-Basil Cocktail
Serves 2 2 Tbs fresh basil 2 ounces Strawberry Basil Shrub 4 ounces (2 shots) tequila 12 ounces sparkling water (can be mineral water or your favorite fizzy water brand...we use locally-produced Sparkle in the lemon or lime flavor but use your favorite flavored or plain mineral water) 6-8 drops Bitters Ice cubes Lemon wedge Pinch of salt (I like to use a nice flaky sea salt here) Divide the fresh basil between the two cocktail glasses. Crush lightly with a muddler or wooden spoon to release its flavorful volatile oils. Add ice cubes to the glasses. Combine the shrub, tequila, sparkling water and bitters in a pitcher or mason jar and stir well. Pour the cocktails into the glasses over the ice, dividing evenly. Add a squeeze of fresh lemon, a pinch of chunky sea salt, and serve. 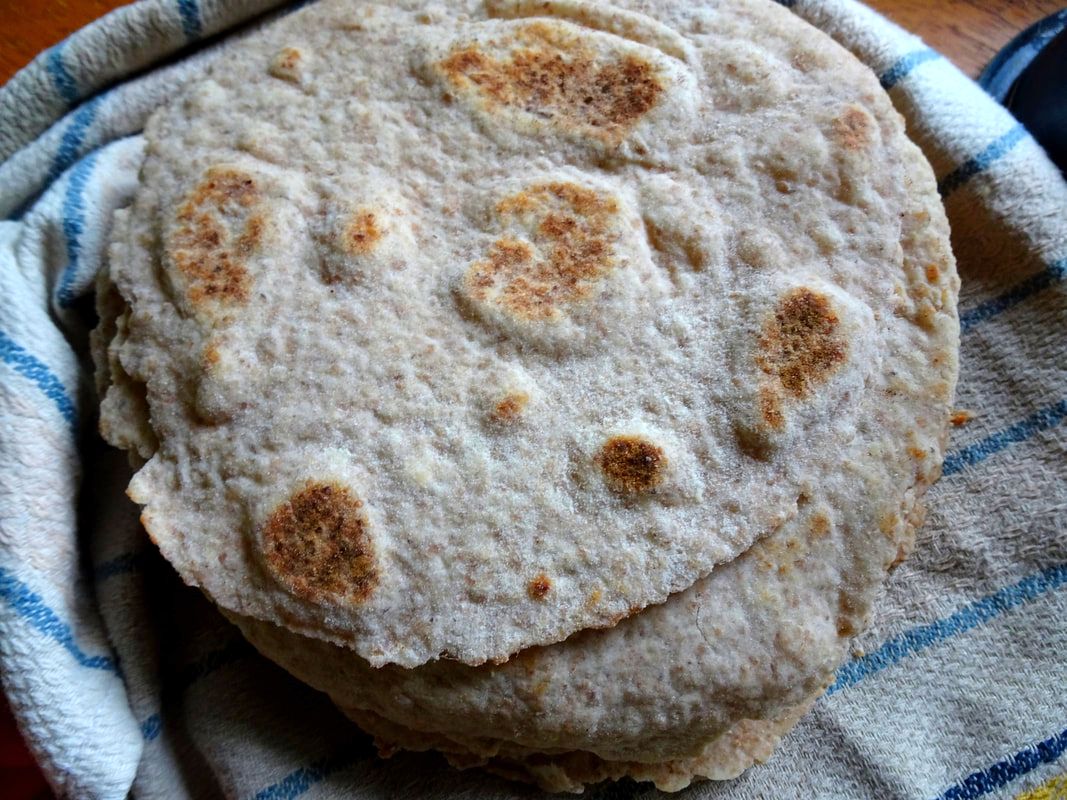 Spending lots of time at home continues, as does more and more bread baking--hopefully sourdough bread! I did a previous post a while back on ways to use extra sourdough starer, by making sourdough pancakes, and I hope that you get to make lots of these tasty cakes topped with your favorite summer berries right about now. But if you are looking for more recipes to use your sourdough discard and, even better, a way to get your sourdough fix without turning on your oven in the summer heat, then this recipe is perfect. I absolutely love flour tortillas and, though we usually make corn tortillas for our go-to taco shell, sometimes a soft and chewy flour tortilla is what you want. Much like so many other foods we love, the store-bought versions of tortillas tend to be sub-par, both in quality and ingredients, so I usually like to make my own. While corn tortillas may make a faster weeknight dinner, flour tortillas could be the perfect weekend cooking project. You could throw together a Sunday morning breakfast burrito bar or just make up a double batch to eat throughout the week. To be sure, the extra time and effort with fermentation and rolling is so worth it. I played around with a few versions of sourdough tortillas, tweaking until I found one we loved. If you are interested, my version is adapted from recipes on the Ashley Marie Farm and Bakery and Butter for All blogs....both of those are amazing, so go check them out! In this version of homemade flour tortillas, you get the benefits of whole wheat, full of fiber and minerals like zinc and magnesium, along with the benefits of naturally-fermented grains by making these using sourdough starter. The addition of sourdough allows fermentation of the wheat for improved nutrient bioavailability and digestibility. I do toss in some unbleached white or high extraction flour to lighten these up, making them less dense and keeping a bit of that nostalgic tortilla flavor I dream of, but feel free to use all whole wheat here (or all white if you are feeling wild). The other ingredient that really makes these tortillas stand apart from pre-made versions is the use of lard as the fat in the recipe, while commercial flour tortillas will use refined, processed oils such as soybean or canola. Lard provides a flaky texture that crisps up nicely when griddle-cooked (think the best quesadillas ever), plus it adds awesome flavor and a healthy fat profile. It is traditional to use lard in flour tortillas, but so many people have gone away from using this amazing animal fat in their cooking that real tortillas can be hard to find these days. If you haven't used lard in your cooking, this is a great recipe to start with. Check this post out that I wrote for the Mother Earth News blog to learn how to render your own lard at home! In addition to the lard, I added in a bit of avocado oil as well, as the liquid oil lends flexibility in the tortillas. I tried some versions with all lard but they were so ricj and flaky that they bordered on pastry-like (which was delicious, I must say). This meant they weren't as pliable as I wanted, so I swapped out a bit of lard for avocado oil; you could use other liquid oil such as olive oil, but I like the high heat tolerance of avocado oil and its neutral flavor, letting the freshly ground wheat and home-rendered lard flavors shine.  Home-rendered lard for the tortillas...this batch was made from lamb Once you make these tasty wrappers, you can fill with whatever you like. Flour tortillas wrapped in shredded pork or sliced steak along with sauteed onions and peppers make a superb fajita, or fill with beans and cheese for a throwback burrito. My favorite has got to be soft scrambled eggs, bacon, cheese, and avocado for a killer breakfast burrito or taco, but I am sure you will find your favorite after you make these enough times! Sourdough Whole Wheat Tortillas with Lard
Makes 12 burritos-sized or 18 taco-sized tortillas--feel free to double or triple for a mega tortilla batch! 1/2 cup bubbly, active sourdough starter 2 cups whole wheat flour 1 cup unbleached white flour or high-extraction flour 1 1/2 tsp sea salt 1/2 cup lard 2 Tbs avocado oil 1/2 cup warm water (around 80 degrees F) The evening before you plan to make your tortillas (or 6-8 hours prior to making them), feed your sourdough starter so that is active and ready to use in the morning. To make your tortillas, combine the flours and sea salt in a mixing bowl and stir well to combine. Cut in the cold lard, similarly to making a pie crust, using a fork or pastry cutter to combine the lard with the flour to create a wet sand-like texture. Be careful not to over-mix here. Add in the active starter, avocado oil and warm water, and stir to combine. You will have a dough that is sticky and quite wet, but it will get less sticky as it ferments. Mix well to create a smooth dough, but do not knead the dough, as you want the end result to not be tough or chewy. Place in a bowl and cover with a cloth. Let sit at room temperature for at least 8 hours, up to 12 hours. Cover the bowl with a lid and transfer the fermented dough to the fridge to cold ferment overnight, or at least 4-6 hours. To cook the tortillas, remove from the fridge and divide into either 12 or 18 evenly-sized pieces, depending on how big you would like your tortillas to be. Roll each piece of dough into a ball and set aside. Preheat your cast iron skillet over medium-high heat. Prepare each tortilla for cooking by generously flouring your surface and rolling out a dough ball into a circle, about 1/8" thickness. Cook in the preheated skillet for 30-60 seconds per side. It should have some nice bubbles and a bit of browning when it is done cooking. Remove from the skillet and repeat with the rest of the tortillas. I like to roll one out while the other cooks, speeding up the process quite a bit. If you plan to serve these right away, keep warm by wrapping in a tea towel or store in a tortilla warmer until ready to serve. To store, keep in an airtight bag in the fridge, where they will stay fresh for up to a week. You can also make a larger batch and store in the freezer for longer-term storage, up to a few months. |

Brine & Broth
I am a gut health-focused nutritionist and online health coach based in Southwest Wisconsin. My recipes and philosophies center around traditional, nutrient-dense foods that support robust gut health. Archives
May 2022
Categories |
 RSS Feed
