|
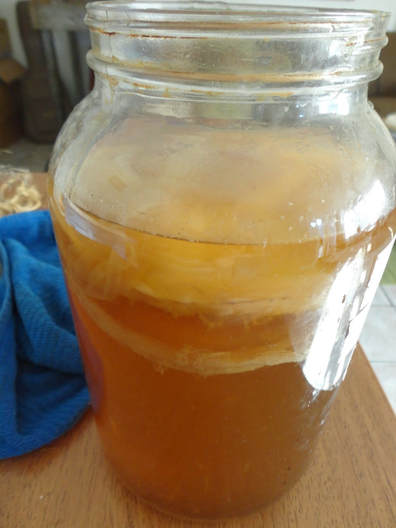
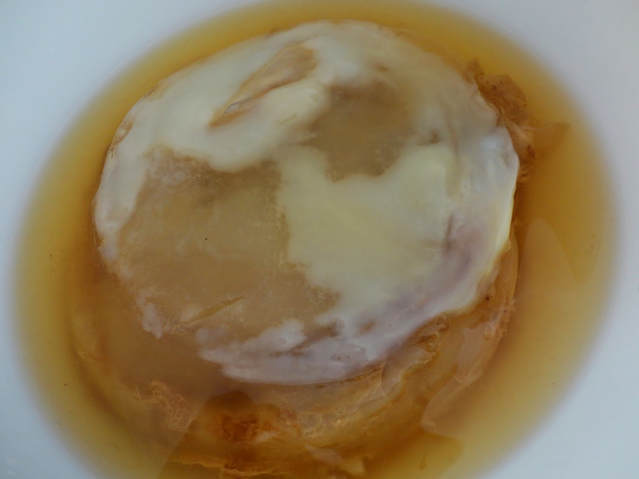
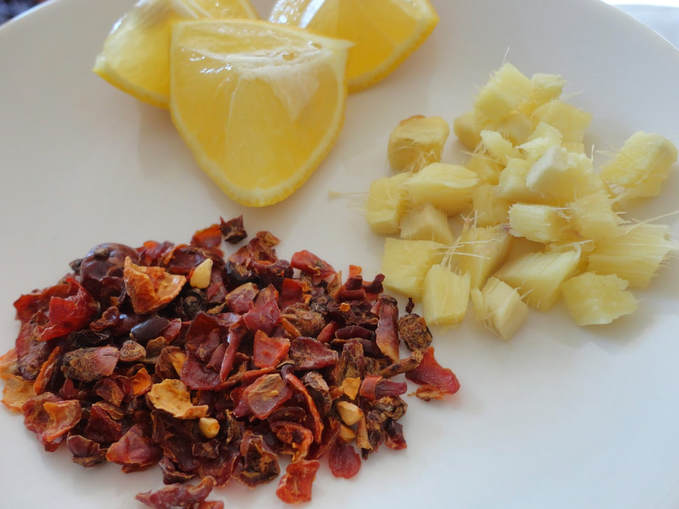
Kombucha, the fermented tea beverage, has become the darling drink of the health food world in the last few years. Health foods stores and conventional stores alike are carrying so many different brands and flavors, and the popularity of the drink seems to only be increasing. Kombucha is a fermented beverage, made by culturing a sweetened black tea with the kombucha starter, also known as a SCOBY (symbiotic colony of bacteria and yeast). The bacteria and yeast that are present in the SCOBY feed on the sugar, therefore facilitating fermentation. By ingesting kombucha, you get to consume lots of good bacteria and yeasts, even more potent than a supplement. This is good news for your digestive health, skin, and even immune system! The beverage also has a detoxifying effect on the liver, is high in antioxidants, and can improve stomach acid levels. Unfortunately for those who are already kombucha fans, these tasty beverages run at least 3 dollars for a 16 oz. bottle, so if your kombucha habit is anything like mine, it can get pretty expensive! That is why making your own kombucha at home is so wonderful; it is extremely cheap, pretty easy to make when you get the hang of it, and you still get all the health benefits. Plus, you can make any flavors you want and get creative in the kitchen. I use the continuous brew method of making my own kombucha. There are two basic methods, the other being the batch method. For me the continuous brew method is a lot easier, and I have found I get much better results, including a better tasting end product that has better carbonation. For this how-to, I will be giving the instructions for the continuous brew method, but if you want to try the batch method, you may try it and see if it is for you. For even more information of the how's and why's of kombucha making, check out the Kombucha Kamp website, which is full of great stuff on the topic! You can also purchase a SCOBY, or mother culture, on this website if you don't have a friend to give you one. To make your kombucha you will need a one gallon jar, and it is best and easiest to use one with a spigot, like a sun tea jar, and some bottles for after its brewed. I use flip-top bottles often used in home-brewing beer for the second fermentation, which you can find online or at home brew stores. You will also need loose leaf black tea, organic evaporated cane juice, and filtered water. Step 1: Obtain your starter culture If you already know someone who brews their own kombucha, you can easily get a "mother" culture from them. Each time you brew a new batch of kombucha, a new scoby (the big, gelatin-like form) will grow. You only need one scoby for a gallon batch of kombucha, so the new ones can be given away to others to start their own home brews! If you can't get one from someone you know, you can get them online from Kombucha Kamp or Cultures for Health. Do not use a starter culture that has been dried/dehydrated. Fresh is the best, and preferably one that has not been refrigerated. You can also use a bottle of plain, unflavored kombucha that is store-bought as your starter culture if you can't find one anywhere else--but be sure it has no additives and has not been pasteurized! If you already have a scoby and some kombucha (this is your second time through the process, perhaps), then you remove the scoby with clean hands and set it aside in a bowl, along with 1 cup of the kombucha tea, which will be your starter liquid. This will work to inoculate the sweetened tea to start the fermentation process. Use the kombucha from the top of the jar for your next batch, and save the brew at the bottom for drinking this round. It has more yeast in it, so the new culture will grow better from the stuff on top and the kombucha at the bottom will produce better fizz. This is why having a spigot is so nice. Not only is it easier to get your tea out, but you also pull from the bottom, and leave the tea at the top for the next batch. If you only have a basic glass jar, that is still totally fine to use. Once you have set aside a previous culture or have your new one ready, have a clean 1-gallon jar ready. No need to sterilize the jar, just a clean glass jar will do--never plastic or metal! Step 2: Brew Tea The tea is important to the brewing process because of the pH level and tannins it lends to the process, which help facilitate fermentation. I have found black tea to work best, and it is said to be the most traditional tea to use, as opposed to the green tea and honey variation, Jun. Some people have success with a blend of black and green tea, but I have found plain black organic tea yields the best results. For 1 gallon of kombucha, I use 2 heaping tablespoons of organic loose leaf black tea. To brew your sweet tea, bring 1 quart of filtered water to a boil and add the loose tea. Remove from heat and cover. Let steep 8-10 minutes. Brewing the tea too long can leave it bitter, so keep an eye on your steep time. Strain the tea into the empty gallon jar. Step 3: Add Sugar Please don't let this step scare you, or deter you from making kombucha all together. The sugar is for the bacteria and yeast to do their jobs, not for you! Bacteria need simple sugar to survive, and straight up evaporated cane juice is the best way to go for this ferment. Add your sugar, 2/3 cup-1 cup for a gallon of kombucha, to the strained hot tea. Stir well with a wooden spoon--not metal or plastic spoons--to dissolve the sugar completely. Then, add the rest of your water to dilute the tea to the normal strength. Leave a few inches of room at the top for your starter liquid and scoby. Fill the rest of the jar with cool water, leaving 2-3" headspace at the top for the scoby and starter. By heating a smaller amount of water then diluting the tea to the proper strength, it takes almost no time to cool to room temperature before adding the scoby--if you add a scoby to hot water, it will kill it. 4. Add SCOBY and Starter Liquid to Sweetened Tea Now that the tea is cooled, you can add the scoby culture and starter liquid. The starter needed is 1 cup of prepared kombucha tea from previous batch or, if this is your first batch, whatever came with your SCOBY. If you don't have this, you can use 1 cup of store-bought plain kombucha. Simply add the starter and scoby gently into the prepared tea and cover with a clean cloth or towel. Tie a string around the top to keep the cloth in place, or use a rubber band. This keeps out bugs and dust and such, but lets the natural bacteria and yeast in to help populate your tea. Be sure to use a towel with a tight weave for this; if you try using cheese cloth or a towel with a loose weave, fruit flies and mold will most likely make a home in your brew. 5. First Fermentation This is the easy part, because it is just waiting! The first fermentation lasts about 1 week. Place your brewing kombucha in a warm place, that is relatively dry and out of direct sunlight, and leave it alone. No need to mess with it, stir it, jostle it. Just leave it alone for 5-7 days. After 5-7 days, you can taste your kombucha and see if it is at the right stage for you. If it is too sweet, let it ferment for a few more days. If it is too sour or tart, it is not ruined, but you might not enjoy it as much, then you know to reduce the time you let it ferment next time. This can depend a lot on temperature and humidity in your house, so you may have to experiment at different times of the year. In the warmer months, this will go more quickly than in the cooler months. If your house is always climate-controlled at the same temperature, then 7 days will be about right. 6. Second Fermentation Now it's time to bottle the kombucha and get it all bubbly and tasty. If you like the kombucha as is, feel free to just drink it now. You may want to refrigerate it for better taste and more refreshment, but it isn't necessary. However, if you want your kombucha to have that wonderful carbonation--which makes it a great substitute for soda or even beer--then this step is important. To get the best carbonation, I use flip-top amber bottles, but used kombucha bottles from store-bought brands will substitute well. At this point you also add your flavorings. You can add about 2 tablespoons of fruit juice or fruit puree, pieces of whole fruit, fresh ginger or even your favorite herbs. I like to keep my flavorings to 2 Tbs per 16 oz. bottle, so you still get that nice kombucha flavor. Add whichever extras you're using to your bottles before adding the kombucha to the bottle, however, so you know you leave yourself with enough room in the bottles. Some of my favorite combinations are Rose Hip-Lemon-Ginger, Elderberry-Hibiscus-Orange Peel, Concord Grape, and Watermelon-Mint. If you have a jar with a spigot, simply decant enough kombucha into your bottle to fill it all the way to the top. Top with the lid and set aside. Repeat again until all the kombucha is used. If you don't have a spigot on your jar, you can take the scoby and 1 cup of liquid off of the top with a ladle, then use a funnel to pour the kombucha into the individual bottles. For this, look for a small funnel that will easily fit into the opening of your bottles. Once you have flavored and bottled your kombucha, then you get to just let it sit again. I usually leave mine for about 3-5 days, until they are fizzy to my liking. You can check yours after about 3 days and test them, and leave them to ferment a little longer to get them more carbonated. Because this is the continuous brew method, be sure to save 1 cup of brewed kombucha from the top as your starter liquid for your next batch! Once you have completed this step, you are ready to restart the process back at step one with your scoby! 7. Refrigerate and Enjoy! I like my kombucha chilled, which I think makes it a really refreshing drink. You don't have to refrigerate it before drinking, but I recommend it. Once they are stored in the fridge, your bottles of kombucha will last several months--though you will likely drink them before then! 4-8 ounces a day is a good serving of regular strength kombucha for most people. This process is continuous, so you repeat it each time you pour one batch into bottles. Never leave kombucha scoby without sweetened tea in it for long periods of time, more than a few days, as this is its food and it can die without it. If you need or want to wait a few days before starting a new batch, just leave the scoby and the starter liquid in a covered jar, but do not refrigerate. Leave at room temperature until ready to start a new batch. Don't forget to give away your newly-formed scoby's from each batch to a friend, or start another gallon of kombucha with it, as you only need one scoby per gallon of kombucha. You could have a little kombucha hotel going with lots of jars! If you don't want to make more, however, you can just compost the scoby as well. Continuous Brew Kombucha Kombucha has been a health food staple for several years now, and it not just because it tastes so good! This drink is full of probiotics, as well as organic acids that help promote detoxification, digestion, improved immune system function and even better skin. This is the perfect alternative to pop or other sweet drinks and is great for all ages. You can make this all your own by adding your favorite fruit juices or other flavors during the second fermentation. 1 starter culture (aka SCOBY or mother culture)
1-2 cups starter liquid (ready made kombucha tea) 4-6 tsp black tea 3⁄4-1 cup organic sugar 1 gallon filtered water Add ins: fruit juice, ginger, herbs, rose hips, lemon, berries, etc. Directions: Set aside SCOBY and starter liquid in a small bowl. Bring 1 quart of the filtered water to a boil and add the tea. Let steep 10 minutes. While the tea is steeping, add the sugar to your fermentation vessel. A sun tea jar or other glass jar with a spigot is ideal, but any 1 gallon glass jar will do. When the tea is steeped, strain and add to the sugar. Stir well to dissolve the sugar. Add the rest of the filtered water, leaving a few inches of room at the top to add in your starter. When the tea is at room temperature, add the starter liquid and mother culture. Cover your container with a clean cloth and secure in place using a string or rubber band. Let sit in a dry place out of direct sunlight for 7 days. After 1 week, you are ready to bottle for the second fermentation. You will need six 12 ounce bottles. Add your flavorings, such as 2-3 Tbs of fruit juice or 2-3 tsp of dried herbs to your bottles. Pour off the prepared kombucha into each bottle, filling to the top. Add your lid and close tightly. Let sit another week on the counter. This will let the kombucha carbonate and get that nice bubbly fizz that people love. I re-use amber bottles from store bought kombucha, or you can buy flip top bottles for bottling, which give the kombucha lots of fizz. Save 1-2 cups of the prepared kombucha tea to use as the starter for your next batch. Set this aside, along with the mother culture. If the SCOBY has produced a second mother, you can separate them and make a second gallon or give away to a friend who wants to try kombucha making! Do not let the SCOBY get too large, or it will make your kombucha too acidic and won't have as pleasant of a taste. Start the process over again with the new starter liquid and your SCOBY. You will be making a new batch once per week or so.
0 Comments
Leave a Reply. |
Brine & Broth
I am a gut health-focused nutritionist and online health coach based in Southwest Wisconsin. My recipes and philosophies center around traditional, nutrient-dense foods that support robust gut health. Archives
May 2022
Categories |


 RSS Feed
